| Author |
Message |
 |
|
|
|
|
Advert
|
Forum adverts like this one are shown to any user who is not logged in. Join us by filling out a tiny 3 field form and you will get your own, free, dakka user account which gives a good range of benefits to you:
- No adverts like this in the forums anymore.
- Times and dates in your local timezone.
- Full tracking of what you have read so you can skip to your first unread post, easily see what has changed since you last logged in, and easily see what is new at a glance.
- Email notifications for threads you want to watch closely.
- Being a part of the oldest wargaming community on the net.
If you are already a member then feel free to login now. |
|
 |
2020/06/20 19:52:06
Subject: Re:Turaxa's Occasional Painting Log - Retro painting
|
|

Regular Dakkanaut
|
More progress. I tackled the model's head this time and had many hold-you-breath moments while painting it.
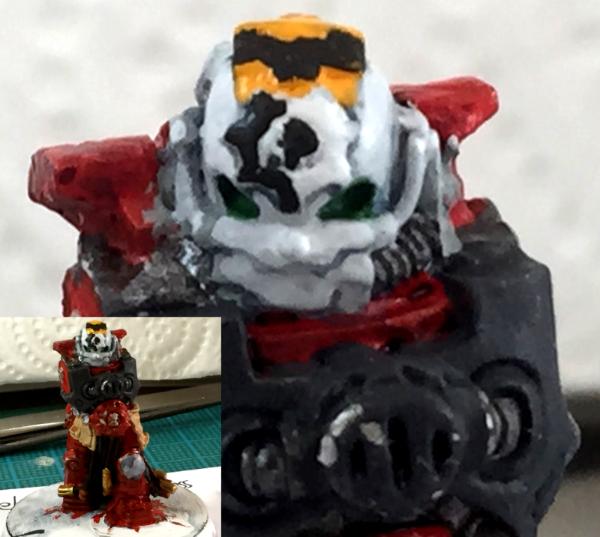
I decided to paint the figure with a veteran's white helmet to make the head stand out and break up the overall red scheme a bit more. This is the first time that I have tried to paint white with a series of greys rather than just using white paint.
I got some tips from this helpful thread. The layers were:
Celestra GreyShadow Grey washFortress GreyCeramite White + a little Fortress Grey (because pure Fortress Grey wasn't light enough)Ceramite WhiteIt's not the ideal white recipe but it's what I had to work with. The result looks better in real life than it does in the picture.
|
|
This message was edited 1 time. Last update was at 2020/06/25 10:53:30
|
|
|
 |
|
2020/06/27 17:20:25
Subject: Re:Turaxa's Occasional Painting Log - Retro painting
|
|
Regular Dakkanaut
|
Nearly done.
|
|
|
|
|
|
2020/06/27 20:49:29
Subject: Re:Turaxa's Occasional Painting Log - Retro painting
|
|
Regular Dakkanaut
|
Nice work! A few thoughts would be to thin your paints more, if it goes on in one coat its too thick, I usually have to apply three coats minimum to get a solid colour, also did you mean to have a gloss finish on the red?
As for the breathe holding, I used to suffer from that but i developed a technique to increase brush steadiness without suffocation! I rest the middle or ring finger of my brush hand on the model which makes them shake in tune with each other ;D (see pic)
|
|
|
|
|
|
2020/06/28 22:53:14
Subject: Re:Turaxa's Occasional Painting Log - Retro painting
|
|
Regular Dakkanaut
|
Thanks for the feedback. Some of the paints I have are rehydrated colours from GWs "bolter shell" paint pot days, so I had trouble with some paint going on too thick and other paint flowing where it shouldn't. Practise makes perfect though. The glossy red wasn't deliberate but I didn't mind the look so I went with it. Ideally I would put a final topcoat of matt varnish on it, but I don't have any just now.
|
|
|
|
|
|
2020/06/30 17:45:25
Subject: Re:Turaxa's Occasional Painting Log - Retro painting
|
|
Regular Dakkanaut
|
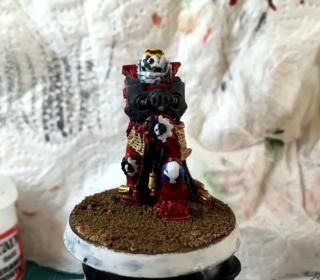
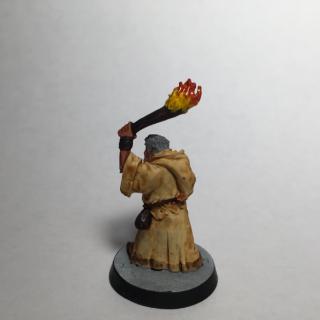
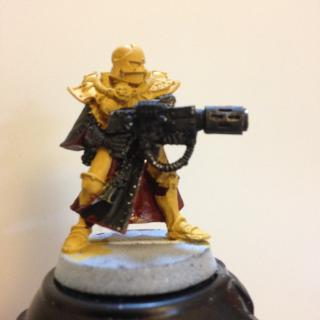
The techmarine is finally finished!
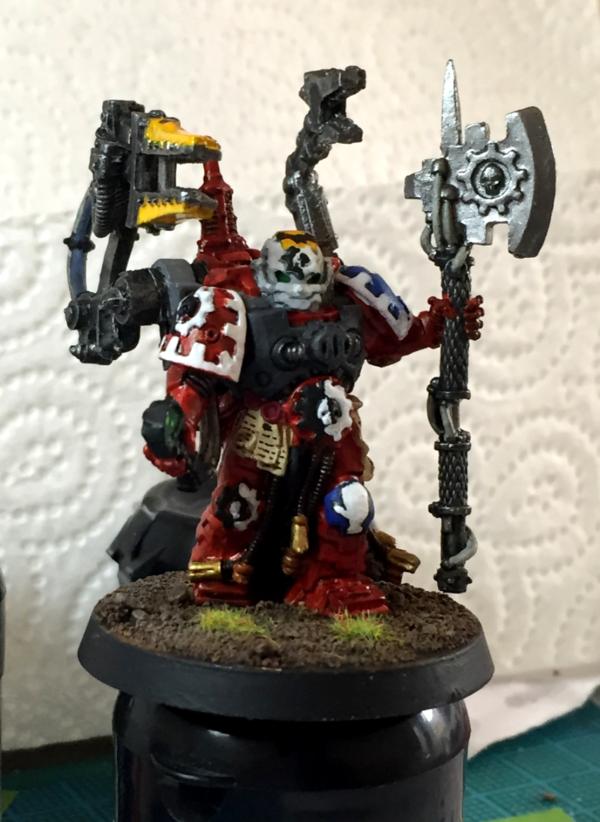
All the details got a bit maddening by the end, and there are many small mistakes on this, but overall I'm quite pleased with how it turned out. The glove-like symbol on the model's left knee plate is supposed to be a white hand. Before Second Edition 40K, techmarines weren't painted red (unless they were Blood Angels) and didn't display the Mechanicus symbol. Instead the Astartes symbol for a techmarine was a yellow hand. You can see an example of this from the old Space Marine Painting Guide below.
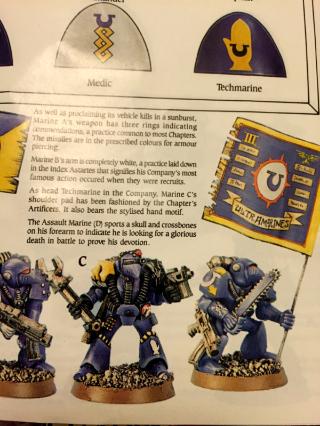
This page also shows an Ultramarines techmarine with the hand symbol rendered in white on his greave, so that's where I took the inspiration from. The black outline for this symbol and the writing on the parchment and purity seals were done with a black size 005 Pigma Micron pen from Sakura. It's the first time I've used one and it made getting the parchment scripts to look good much easier.
|
|
|
|
|
|
2020/07/01 05:34:01
Subject: Turaxa's Occasional Painting Log - Retro painting
|
|

Fixture of Dakka
|
Keep at it Turaxa. You can see the improvement in each model you are painting.
Cheers,
CB
|
|
|
|
|
|
2020/07/08 01:18:42
Subject: Re:Turaxa's Occasional Painting Log
|
|
Regular Dakkanaut
|
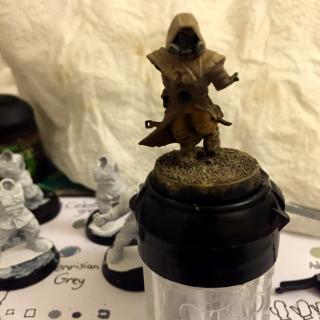
@ Captain Brown: Thank you for the encouragement. 
I recently picked some plastic Chaos cultists out of the pile of shame. Most are obvious renegades, but this trenchcoat-and-gasmask guy doesn't seem obviously chaotic to me. I get more of an "ash waste nomad" vibe from him so I'm painting him up in desert-ish colours.
|
|
|
|
|
|
2020/07/11 20:43:28
Subject: Re:Turaxa's Occasional Painting Log
|
|
Regular Dakkanaut
|
Desert-ish guy is done:
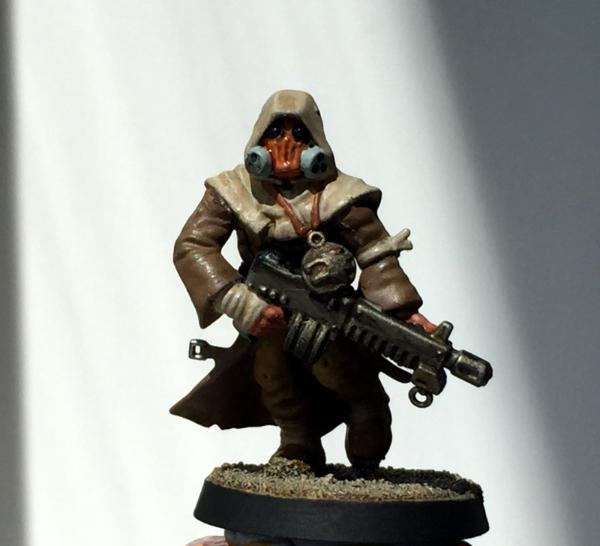 A nomadic raider of the ash waste deserts. Or something.
I was a bit unsure how this figure was going to turn out while painting it. Maybe the contrast between the legs, coat and hood should have been greater, but it wasn't bad once it all came together.
I also entered some guardsmen into the Dakka Painting Challenge round 65.
|
|
|
|
|
|
2020/07/16 17:31:59
Subject: Turaxa's Occasional Painting Log
|
|
Regular Dakkanaut
|
Looking good, if you are having trouble with the shade washes drying glossy make sure to give the bottle a good shake, and never take it out of the main pot as the Matt medium in these tubs settles out at the speed of light. I will often close it and re shake if doing a sizable bit of shading 
|
|
|
|
|
|
2020/07/20 13:08:30
Subject: Re:Turaxa's Occasional Painting Log
|
|
Regular Dakkanaut
|
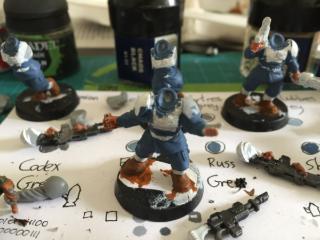
@Maxwin: I didn't know washes needed to be shaken just as much as paints, thanks for the tip.
Some more progress on the guardsmen. The camo is a bit chunky but looks good enough on these chibi Cadians.
|
|
|
|
|
|
2020/07/31 19:51:52
Subject: Re:Turaxa's Occasional Painting Log
|
|
Regular Dakkanaut
|
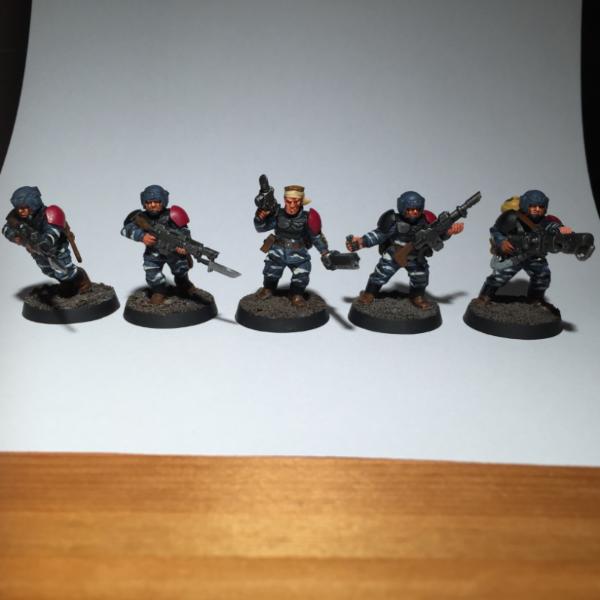
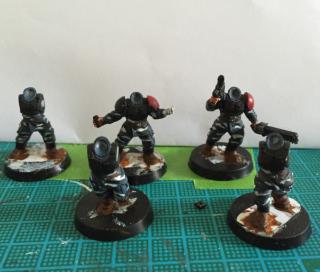
The guardsmen are finished. Building and painting these were a bit of a slog. For me they're in an awkward spot where, at five or six components each, they're not simple enough to just crank them out, but they're not detailed enough to be really fun to build or paint. I don't think these sculpts have aged well, but despite this they do have detailed faces and the flamer components fit together nicely. I also appreciate the inclusion of empty bayonet scabards for models with fixed bayonents, and sheathed bayonets for those without.
The left arm that can go with the grenade throwing arm is a bit of a fudge though, and I realised too late that I should have cut the hand at the wrist and rotated it so that it looks like he is actually holding the gun. Still, I salute all those guard players who build hundreds of these little guys and make them look good.
I found myself suddenly busy at the end of the month, so the bases are a bit of a rush job, Also I didn't have as much time as I would have liked to work on the faces, so no painted eyes this time.
You can see more images of these miniatures here. .
|
|
|
|
|
|
2020/07/31 21:49:31
Subject: Turaxa's Occasional Painting Log
|
|
Regular Dakkanaut
|
Nice work!
|
|
|
|
|
|
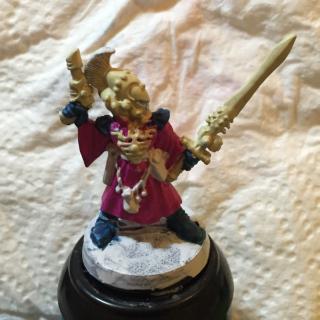
2020/08/20 17:20:14
Subject: Re:Turaxa's Occasional Painting Log
|
|
Regular Dakkanaut
|
Thank you
I haven't got much modelling done this month, but I did start this Warlock.
|
|
|
|
|
|
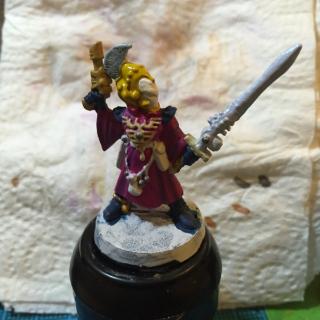
2020/08/27 21:09:25
Subject: Re:Turaxa's Occasional Painting Log
|
|
Regular Dakkanaut
|
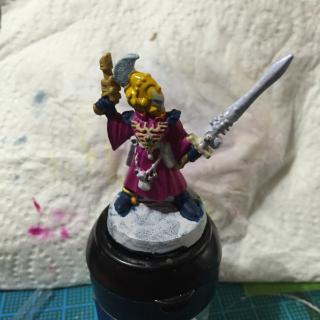
Some progress. Pleased with everything except the sword. I painted on a lumpy coat of elderly Bleached Bone in an efford to get decent coverage, then changed my mind about the colours and decided to try out Reaper's Sparkling Snow straight on top of it. I probably should have applied a white basecoat first.
|
|
|
|
|
|
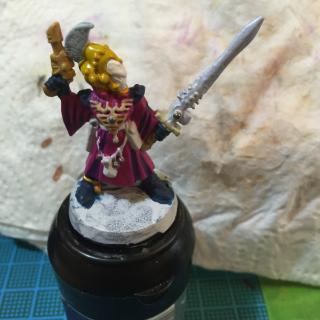
2020/08/28 23:08:00
Subject: Re:Turaxa's Occasional Painting Log
|
|
Regular Dakkanaut
|
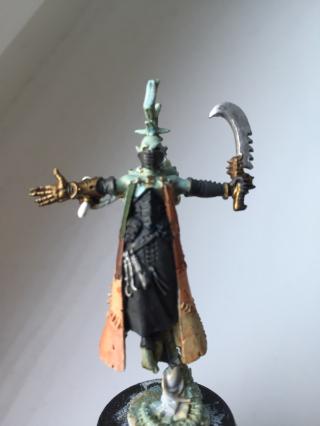
I decided to try and shade the folds on the model's robe, which I usually don't do because I'm rubbish at it. The first attempt was to mix the base colour with some purple wash (left), but that had too much contrast with the base and was too blue so I painted over it with the base colour mixed with a medium grey (right). This looked much more subtle, so subtle that it doesn't really show up in the photograph! It is more apparent in real life though.
|
|
This message was edited 1 time. Last update was at 2020/08/30 21:48:27
|
|
|
|
|
2020/08/30 22:22:03
Subject: Re:Turaxa's Occasional Painting Log
|
|
Regular Dakkanaut
|
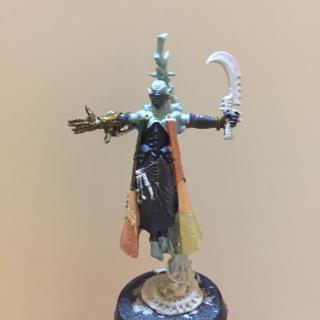
The warlock is finished:
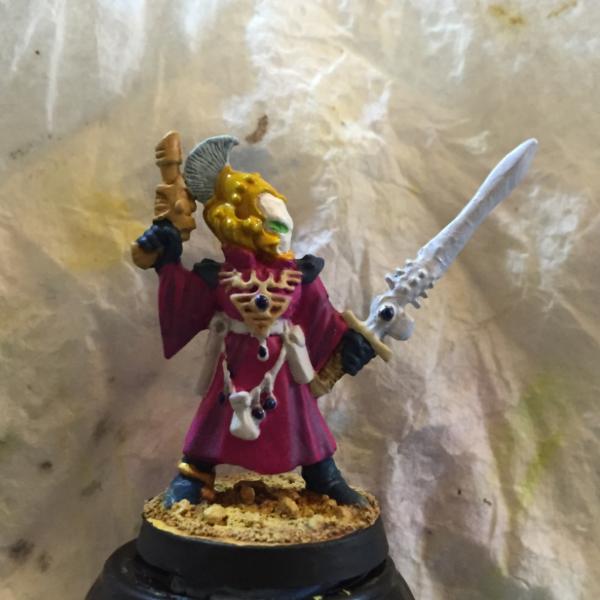
The red-purple robe and yellow helm were inspired by a painted warlock miniature which I've seen in some old 'Eavy Metal pictures. I decided to use blue as the contrasting colour for the figure's undersuit. I don't have many blues so decided to try Vallejo Panzer Aces Periscopes, which is a very blue-hued turquoise and turned out to be a perfect contrast to the red-hued purple I was using, VMC Magenta. They go really well together and it's nice to use them as main colours on a miniature since I've only previously used them to paint lenses.
When I was painting my Cadian 122nd guardsmen, at one point I experimented with painting yellow ink over Bleached Bone. Though I didn't keep it for the final colours I liked the result and decided to use the technique for this model's yellow helm. I think it works really well. I did something similar with the blue gems on the model, they are blue ink painted over Boltgun Metal. Nothing revolutionary I know, but I haven't used inks this much in a while and I'm glad it worked well.
Working not so well were the pearlescent paints I used on the faceplate and the sword. These were Reaper's Pearl White and Sparkling Snow respectively. The problem was that while they were perfectly liquid on the palatte, they dried so quickly that the paint on the miniature and the brush became tacky as I was painting, making it difficult to manipulate the paint and leaving a really uneven finish. I tried thinning them more with water but they quickly reached wash consistency. I've never used these paints before, so maybe some additives of some kind are needed?
This miniatures is also my entry in the Dakka Painting Challenge Round 66.
|
|
This message was edited 1 time. Last update was at 2020/08/30 22:30:56
|
|
|
|
|
2020/08/31 23:31:35
Subject: Turaxa's Occasional Painting Log
|
|
Fixture of Dakka
|
Turaxa,
The Guardsmen turned out nicely.
One suggestion on your Warlock is to do a brown wash on the belt, pouch, holster and the string of items. It will add some definition and make them look more natural.
My two cents,
CB
|
|
|
|
|
|
2020/09/09 23:47:33
Subject: Re:Turaxa's Occasional Painting Log
|
|
Regular Dakkanaut
|
@Captain Brown: Thank you. I was trying to go for a white leather/fabric look on the belts and pouches, and thought a wash might just make them look dirty. I'll go back and give a brown wash a try though.
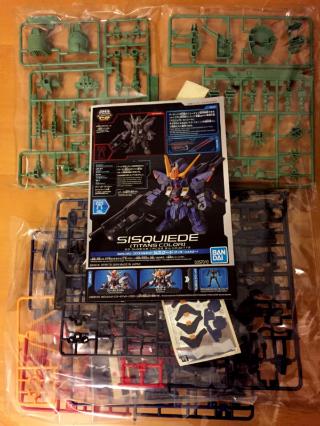
My entry for the Dakka Painting Challenge Round 67 is an MS-06S Zaku II from Bandai's Gashapla range. These are little model kits that are dispensed in capsules from a gashapon machine.

The runners are designed so that the parts can be snapped out without being cut. This particular figure seems to be a scaled-down version of one of the Zaku models from the main 1/144 scale Gundam The Origin kit line, and is quite detailed. I wish I had bought more when I had the chance.
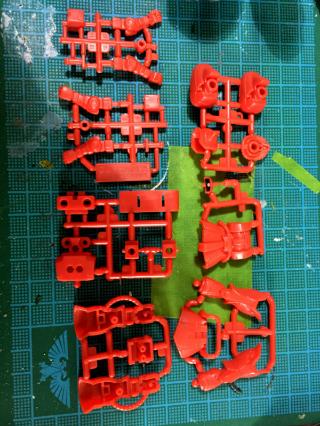
So far I've almost finished the torso of the figure. I tried out Vallejo's Mecha Primer on this kit, but it didn't work well. When I applied the primer neat it shrank from some areas and blobbed in others. When I thinned it with water it pooled in the crevices of the model like a wash. It rubbed off easily when dry as well. I didn't expect to have such trouble with it. Can anyone recommend a good brush-on primer?

|
|
|
|
|
|
2020/09/12 23:10:53
Subject: Re:Turaxa's Occasional Painting Log
|
|
Regular Dakkanaut
|
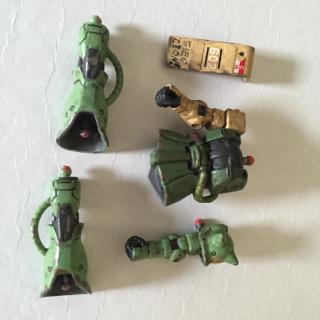
More progress, most of the sub-assemblies are painted. I didn't have a base big enough for the figure to stand on, so I'm makig one from a jam jar lid and some cardboard.
|
|
|
|
|
|
2020/09/15 17:01:38
Subject: Re:Turaxa's Occasional Painting Log
|
|
Regular Dakkanaut
|
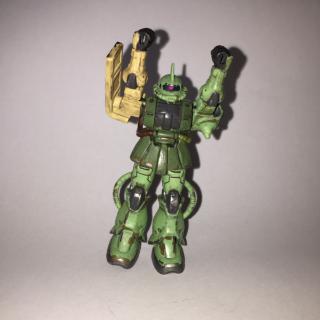
Finished! This figure is inspired by the Zeon Remnants who appear throughout the Universal Century setting of the Gundam meta-series. In Mobile Suit Gundam, the space-dwelling Zeon faction invades the earth and then later retreats, leaving some of its troops behind in the process. These remnants continue to fight sporadically for the next sixteen in-universe years.
The colour scheme is intended to make the model look war-weary, and like it has been repaired with parts from other machines. This is the first time I've tried painting on rust and chipping.

The kit didn't come with any markings, so I spliced together a couple of old model kit transfers on the shield and hand-painted the rank badge on the pauldron. My skills are not up to freehanding the Zeon symbol, so instead I added their slogan as grafitti on the shield.
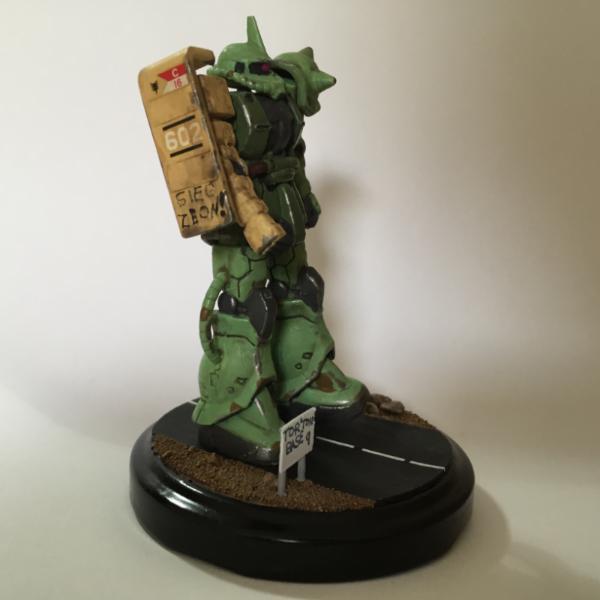

From the rear.
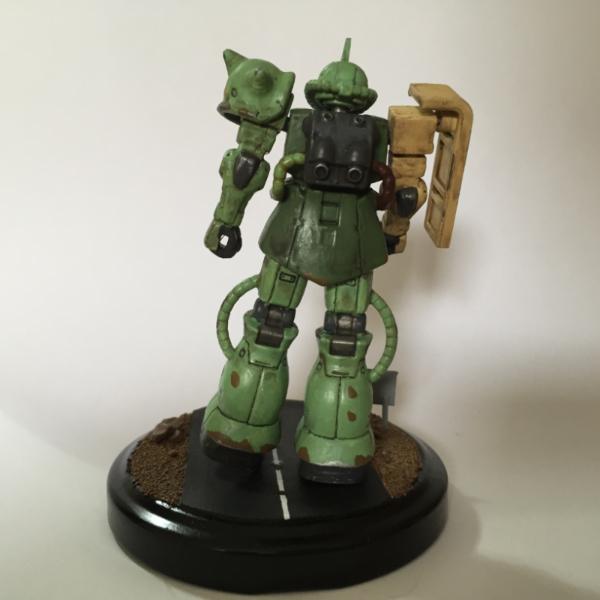
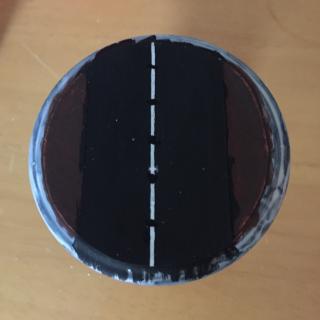
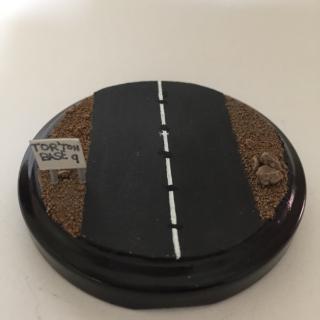
Unfortunately the ankle joints on the kit don't allow it to stand with both feet flat to the floor, leading to this "walking home from a bar" pose. The road sign on the base is a referrence to Torrington Base, where the Zeon Remnants had one of their last battles.
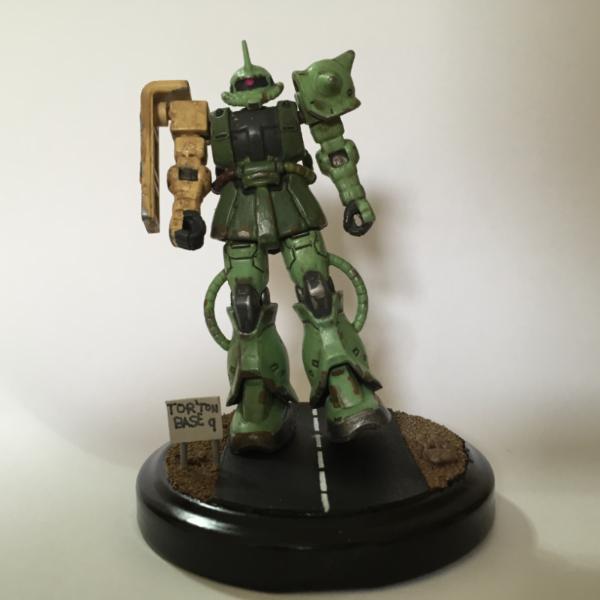
The base by itself, and the Zaku with a space marine for scale.
Zaku, ikimasu!
|
|
|
|
|
|
2020/09/15 18:51:38
Subject: Turaxa's Occasional Painting Log
|
|
Splattered With Acrylic Paint
|
Love the vibrant paint job on the warlock; They're such good miniatures. Also the freehand on your space wolf shoulder pad is great.
Btw, I'm also using some 1994-era citadel paints. I recently bought some new vallejo ones, and I have to say that paints have got better over past 25 years.
Also you should see the coverage you can get on some of the new reds
|
|
|
|
|
2020/09/23 16:49:57
Subject: Re:Turaxa's Occasional Painting Log
|
|
Regular Dakkanaut
|
Thank you. I know what you mean about the newer paints, I got hold of some more modern ones and it really makes a difference. Having said that, some of the old ones I have are the really old kind that became the Coat D'arms range, and they're pretty good for their age.
|
|
|
|
|
|
2020/10/03 01:37:57
Subject: Re:Turaxa's Occasional Painting Log
|
|
Regular Dakkanaut
|
This month, painting up Desert Guy's buddies as actual cultists, and bodging together their boss from the depths of the bits box.
|
|
|
|
|
|
2020/10/18 22:47:37
Subject: Re:Turaxa's Occasional Painting Log
|
|
Regular Dakkanaut
|
Some more work on this pair. The chaos marine was supposed to be some kind of zombie-master-type character, but the bits aren't coming together well and I think he looks a bit derpy. Off to the back burner with him!
The zombie, however, came together nicely. Whittling down the zombie head so that it just about fits in the empty helmet from the Cadian kit was a bit of a chore, but I like the result so he gets some paint.
 This picture apparently taken with a GW-issue potato camera.
|
|
|
|
|
|
2020/10/25 21:37:23
Subject: Re:Turaxa's Occasional Painting Log
|
|
Regular Dakkanaut
|
The zombie is finished. He's my entry into the Dakka Painting Challenge round 68.
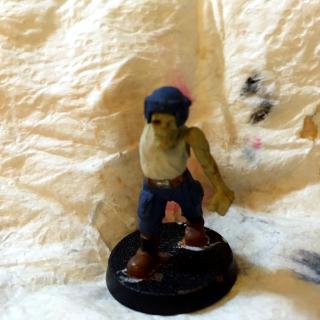
 Pte. Walker, formerly of the 122nd Cadian regiment.
|
|
|
|
|
|
2020/10/30 02:44:45
Subject: Re:Turaxa's Occasional Painting Log
|
|
Regular Dakkanaut
|
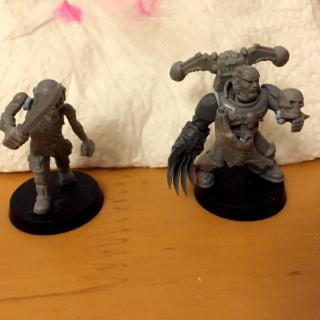
I wasn't really enjoying painting the chaos guys, so instead I pulled a Dark Eldar Haemonculus from the pile of shame. This was an Ebay purchase at some point. I think it's Finecast, but it's a surprisingly clean cast if it is with very little flash and only one miscast piece.
Now ages and ages ago I had the idea to do a Dark Eldar army themed around the Haemonculi, where all the troopers had a gribbly bio-tech look to them, kind of like the Eldar meets the Borg. Unfortunately I couldn't think how to do the hoses and cables that I wanted, so I only got as far as this one crude prototype before abandoning the idea.
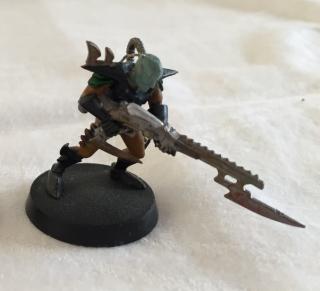
Subsequently GW also had the same sort of idea (and probably cooler prototypes) and created the Haemonculi covens. Anyway I thought I would pay homage to my lonely prototype Deldar and paint the Haemonculus in a similar colour scheme.
I carried across the black armour, while the brown parts of the suit became the flayed hide cloak. I don't know what colours I mixed to get the original figure's skin tone, but I found a Vallejo colour that is close enough. I might give it a green or yellow wash later to bring it a bit closer.
|
|
|
|
|
|
2020/11/01 15:54:09
Subject: Re:Turaxa's Occasional Painting Log
|
|
Regular Dakkanaut
|
More progress on the Haemonculus. I like this miniature, but it has some absolutely tiny details.
|
|
|
|
|
|
2020/11/02 12:16:36
Subject: Turaxa's Occasional Painting Log
|
|

Alluring Mounted Daemonette
Australia
|
Hey mate,
Nice work on the haemonculus - the skin cloak is looking great and suitably mismatched. I like the contrasting metallics too. Really cool skintone too - can see the Borg influence there!
Thanks for sharing - keep it up!
|
t z you are k |
|
|
|
|
2020/12/14 00:14:04
Subject: Re:Turaxa's Occasional Painting Log
|
|
Regular Dakkanaut
|
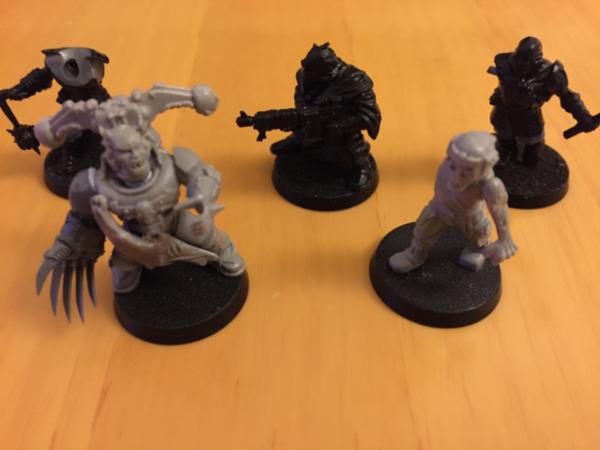
@tzurk: Thanks for the positive comments. The Haemonculus is now finished.
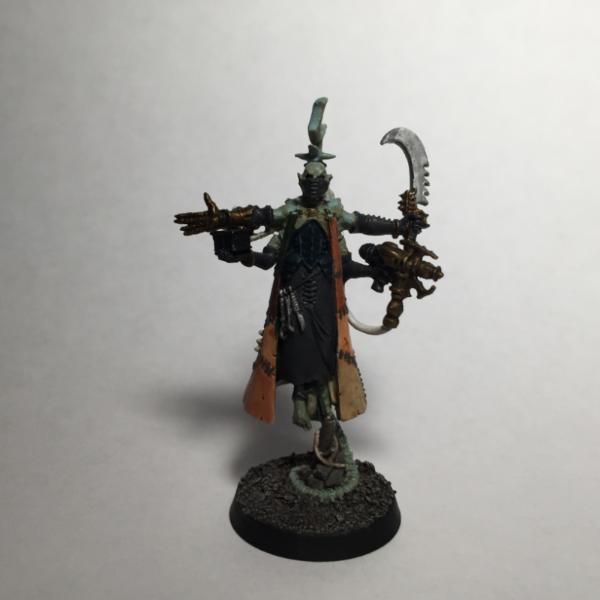
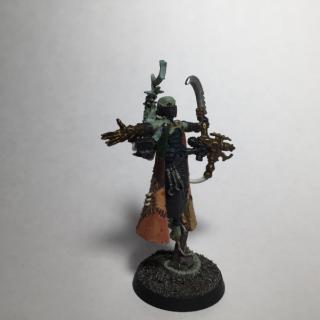 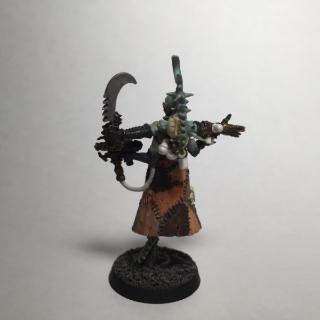
While I was photographing it, I also took some better pictures of the miniature I entered into the 69th Dakka Painting Challenge. He's one of the models from the Mordheim Mob line.
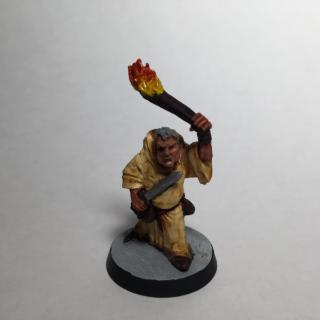 
You can see all the entries here.
My entry into the 70th Dakka Painting Challenge will be this pile of sprues here.
Hopefully to become a cool little SD gundam.
|
|
|
|
|
|
2020/12/27 02:20:33
Subject: Re:Turaxa's Occasional Painting Log
|
|
Regular Dakkanaut
|
One of my pet modelling peeves is models which have hollow parts which are not hollow in reality (or, for fictional things, in-universe). Like many SD Gundam kits, this kit had a couple of such parts, so I filled the offending parts with green stuff and PVA. A bit rough but it works.
So far, painting this kit has been a pain. The kit has armour pannels attacked on top of an articulated inner frame. I tried to paint the frame joints that will be exposed once the kit is fully assembed, but as soon as I moved them the paint rubbed straight off. This was primer, paint and varnish, not just a single layer of paint. I think the Vallejo Mecha Primer that I'm using is really made for airbrush use only, thinning it with water and brushing it on has been nothing but problems.
But with that said,I am making some progress.
I also decided to update the paint scheme for my Crimson Rose Sisters of Battle. Here is a test model.
|
|
|
|
|
|
|
|
 Finished Forge World Elysian Army
  Finished Tau Sept Cadre
  Alaitoc Eldar Warhost
  Finished Order of Our Martyred Lady - Sisters of Battle
  Finished Necromundian Imperial Guard Regiment

