| Author |
Message |
 |
|
|
 |
|
Advert
|
Forum adverts like this one are shown to any user who is not logged in. Join us by filling out a tiny 3 field form and you will get your own, free, dakka user account which gives a good range of benefits to you:
- No adverts like this in the forums anymore.
- Times and dates in your local timezone.
- Full tracking of what you have read so you can skip to your first unread post, easily see what has changed since you last logged in, and easily see what is new at a glance.
- Email notifications for threads you want to watch closely.
- Being a part of the oldest wargaming community on the net.
If you are already a member then feel free to login now. |
|
 |
![[Post New]](/s/i/i.gif) 2007/10/25 12:33:43
Subject: RE: My Baneblade Blog
|
 |

The Last Chancer Who Survived
|
Maybe it was too much water? Or maybe it is the matte medium that helps it stick in the cracks and corners better. If you have an art store nearby give it a shot, it was only like $3 for the bottle I got. I think what you want is about equal parts water & medium. The medium will make the colors dull though, it takes out any kind of shine that the paints will have. I never thought of citadel or valejo paints as having a gloss to them, but with the medium added you can see a difference. But I like the effect, it helps sell the dirty look.
I have most of the metals done already. Didn't take as long as I thought. The biggest problem that's bugging me now is the fuel tanks. It's tough to get the brush in and around them. If I ever make another one, I'm going to leave the tanks off and paint them separately then add them on at the end.
|
|
|
|
 |
 |
![[Post New]](/s/i/i.gif) 2007/10/26 15:28:41
Subject: RE: My Baneblade Blog
|
 |

The Last Chancer Who Survived
|
|
|
|
|
 |
 |
![[Post New]](/s/i/i.gif) 2007/10/29 15:01:43
Subject: RE: My Baneblade Blog
|
 |

The Last Chancer Who Survived
|
Moving on... I finished the main paintjob for the whole tank yesterday.   Now it's time to add the mud to the tracks. I mixed up some colored spackle/wall filler/joint compound. That stuff you use to fix cracks in your wall. I took some of that, some brown ink, a few drops of yellow Vallejo paint and some water and mixed it all up till I I got something that looked like butterscotch pudding. I just eyeballed it, I didn't measure anything really.  (Yummy!) Why did I make it colored instead of just painting it afterwards? Well, I am going to paint it afterwards, but I want a good color to start with and also in the event that any might happen to flake off later, it will still look like dirt. What I'm after is a "dried mud" look where it's light colored, instead of the darker, thicker mud some folks do. So here's some pics of the treads, with the wet spackle mix and then how it looks when it's dry   After it dried I brushed on some watered down white glue to seal it in. This is the same thing I did for my Tomb Kings' spackle cracked earth bases. First coat is drying now, and i'll do a second one in a few. After that, I plan to start the final weathering using Tamiya weathering powders. I did some tests on the underside of the model, I think it's gonna come out really awesome. Also what you can't see in the pics are the transfers I added. I made a sheet of my own that I just printed out. Testor's makes a kit for like $10, but I just bought the blank sheets and sealer spray. 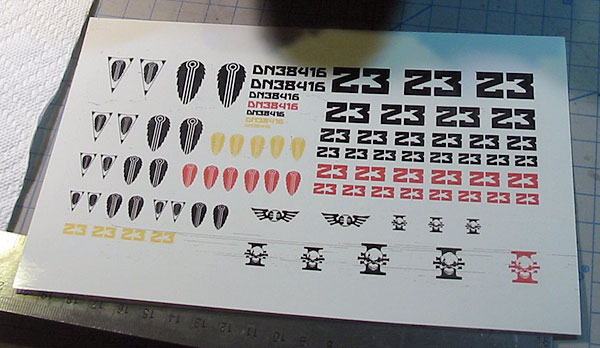 I had wanted to use that red and yellow numbers on the darker areas but it doesn't work.. its too transparent. There's no way to print white and the printer assumes white is just the paper color. So it won't be opaque enough. In the end I just used the wing emblem on the light band on the sides and the numbers from the baneblade transfer sheet instead. I also used a special decal solution that make it conform to the corners of the model really well. Didn't get any pics of the transfers on the model but you can kinda see it in the mud shots. Maybe next time 
|
|
|
|
 |
 |
![[Post New]](/s/i/i.gif) 2007/10/29 15:12:00
Subject: RE: My Baneblade Blog
|
 |

[DCM]
Illustrator
|
Looking really great. And I really like the mud idea you've got here. Well thought out ^_^. Really looking forward to seeing this bad boy all dirtied up and in some proper photos ^_-
|
-Aaron
Call For Fire
DA:80+S+GM(DPC)B++++I+Pw40k99+D++A++/mWD247R++T(M)DM+++++ |
|
|
 |
 |
![[Post New]](/s/i/i.gif) 2007/10/29 15:38:16
Subject: RE: My Baneblade Blog
|
 |

Ollanius Pius - Savior of the Emperor
Gathering the Informations.
|
Necros, I am totally and completely stealing your mud idea =D I'm looking for a good way to cover up some of the issues with my own kit, can you help me think of a way to do good looking camo netting to drape over the turret joins and the main hull?
|
|
|
 |
 |
![[Post New]](/s/i/i.gif) 2007/10/30 00:10:58
Subject: RE: My Baneblade Blog
|
 |

The Last Chancer Who Survived
|
I've never done camo netting but I've seen people use gauze and bandages for it, seems to work pretty well. You could probably use inks or watered down paint to soak into it for the camo scheme and then use some watered down white glue to seal it in and stiffen it a bit.
|
|
|
|
 |
 |
![[Post New]](/s/i/i.gif) 2007/10/31 13:31:11
Subject: RE: My Baneblade Blog
|
 |

The Last Chancer Who Survived
|
Well kids, I think I'm done! Not including the dozer blade of course, but I'm gonna save that for a rainy day and move on to some other projects for now. So, I drybrushed the mud with some Dark Flesh, the dark brown helps it look a bit wet in some places. I started using some of the Tamiya weathering pigments and really I didn't see much of a difference. I already achieved the look I was after with 20,000 washes. So I just added some extra dirt along the bottom with it and used some of the lighter colors kind of like a drybrush. I did experiment with a lot of the blending on test pieces of plastic and I think I'll be using that for the next tank I do, my inquisitor's chimera. So, I sprayed it with some flat varnish tonight and it looks like she's finally ready to go out and blow stuff up. But i won't get to play with it for another 3 weeks  And here's some slightly bigger final pics. Best I could get with my crappy camera and a little photoshop adjustments to try and kill some of the yellowness.. But I just can't get the blues to show up right.. they're actually a bit lighter than it looks (like on the searchlight, etc) 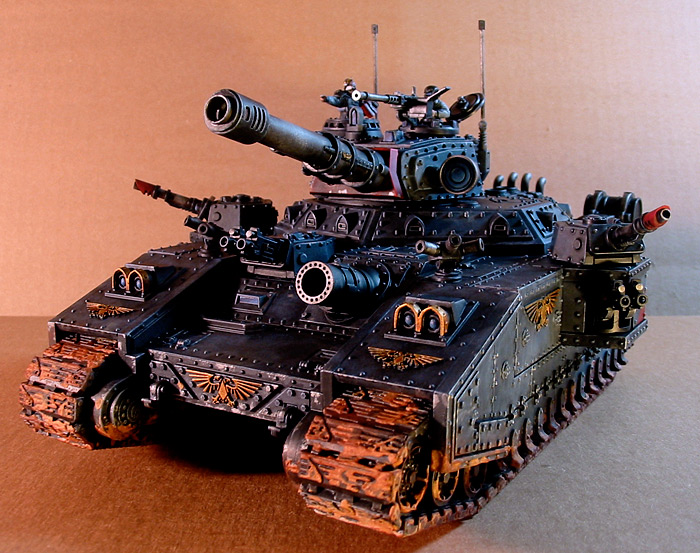 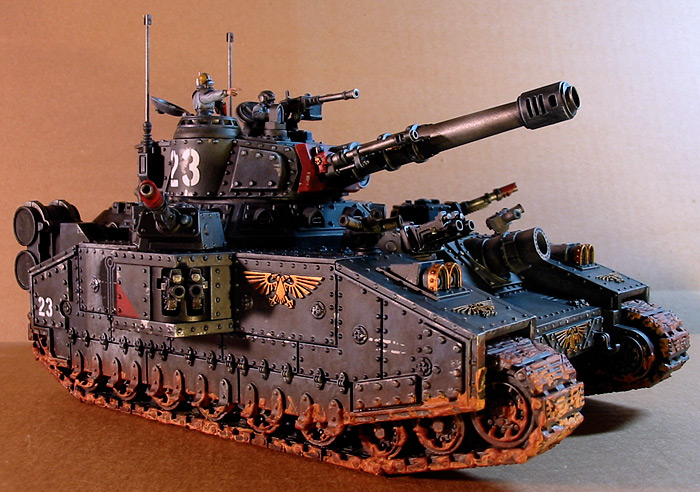 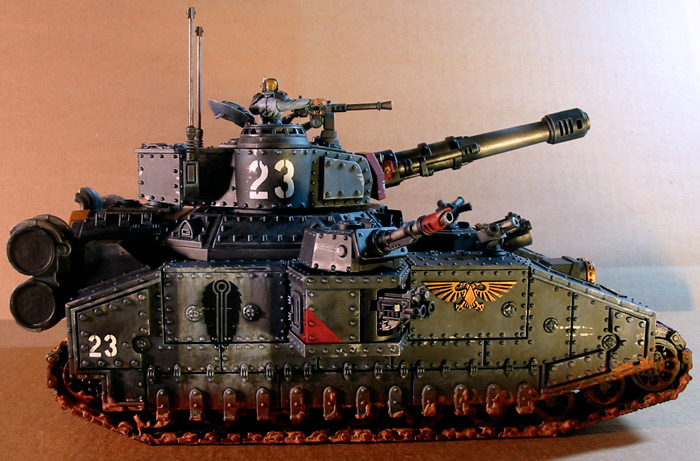 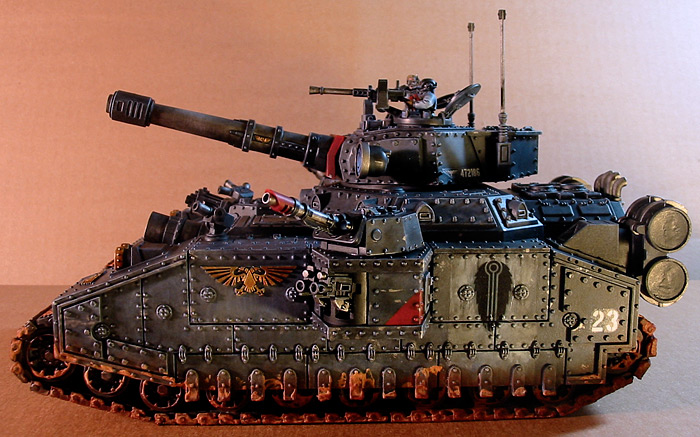 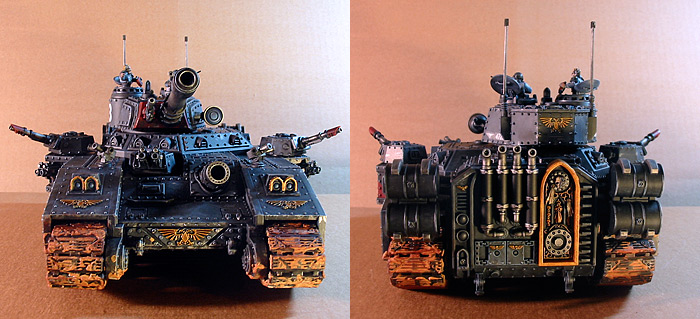 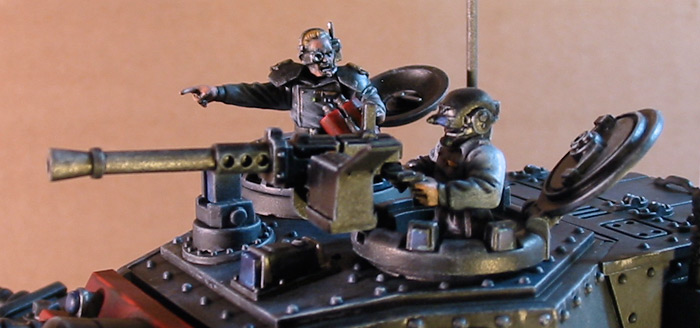 Wadaya think?
|
|
|
|
 |
 |
![[Post New]](/s/i/i.gif) 2007/10/31 14:29:47
Subject: RE: My Baneblade Blog
|
 |

Ollanius Pius - Savior of the Emperor
Gathering the Informations.
|
I still hate you, Necros =P Mine's in the first painting stages.
|
|
|
 |
 |
![[Post New]](/s/i/i.gif) 2007/10/31 14:39:15
Subject: RE: My Baneblade Blog
|
 |

[DCM]
Illustrator
|
I would personally like to see more 'dusting' about another 1/4 up the tank on all sides and about half way up the back side. The top plates would also gather up some dustage after a while as well (not as much as the side armor of course). I'm a big fan of taking bleached bone to just about everything these days though x.x....so might view on tank weathering might be skewed. >.>
Great job overall though. Definitely something that would be a pleasure to fight against.
|
-Aaron
Call For Fire
DA:80+S+GM(DPC)B++++I+Pw40k99+D++A++/mWD247R++T(M)DM+++++ |
|
|
 |
 |
![[Post New]](/s/i/i.gif) 2007/10/31 19:14:39
Subject: RE: My Baneblade Blog
|
 |

Calculating Commissar
|
It's a very nice tank, Necros. This blog is also helpful to me because my own Baneblade will be painted in roughly the same color scheme, with maybe a bit more red. I especially like the colored metallics in the rear shrine and the headlight frames, how did you accomplish those?
|
The supply does not get to make the demands. |
|
|
 |
 |
![[Post New]](/s/i/i.gif) 2007/11/01 00:01:07
Subject: RE: My Baneblade Blog
|
 |

The Last Chancer Who Survived
|
Well for the gold what I do now is I start with a base coat of foundation Iyanden Darksun .. I think that's the color, it's like a brownish yellow. Then I just paint straight shining gold over that.. the foundation color makes the gold look really solid since the paint is a little transparent it usually takes a few coats to go good over black.. so this way is much easier. Anyway, after that I use watered down brown ink and let it pool around the rivets or do extra coats around em, and last I do a drybrush of burnished gold for highlights. As for the weathering, I may go back to it a bit later.. I've been reading about mixing pigments with turpentine to help simulate dirt and grime so I might give it a shot on the next tank and if it looks good I'll go back to the baneblade with it 
|
|
|
|
 |
 |
![[Post New]](/s/i/i.gif) 2007/11/01 20:37:39
Subject: RE: My Baneblade Blog
|
 |

Using Object Source Lighting
|
This is one of the best GW kits and you have done a excelent job with it... Lots of attention to detail and that extra work really payed off. Things like cleaned barrels joints really makes this Baneblade a pleasure to look at. Now you need a big bug to open this can of food. Good work.
|
|
|
|
 |
 |
![[Post New]](/s/i/i.gif) 2007/11/21 23:34:14
Subject: Re:My Baneblade Blog
|
 |

Longtime Dakkanaut
Long Beach, CA
|
Geez that thing was looking like crap at first then as I went through every picture I was more and more impressed until the final product I was totally amazed. Awsome blade.
|
"Do NOT ask me if you can fire the squad you forgot to shoot once we are in the assault phase, EVER!!!"
|
|
|
 |
 |
![[Post New]](/s/i/i.gif) 2007/11/28 03:11:13
Subject: Re:My Baneblade Blog
|
 |

Longtime Dakkanaut
Long Beach, CA
|
Also, what exactly is medium Matte, and where did you get it?
|
"Do NOT ask me if you can fire the squad you forgot to shoot once we are in the assault phase, EVER!!!"
|
|
|
 |
 |
![[Post New]](/s/i/i.gif) 2007/11/28 03:32:19
Subject: My Baneblade Blog
|
 |

The Last Chancer Who Survived
|
matte medium  it's stuff that you mix into acrylic paints to make it not so shiney and when you add water to it and your paint you can make a wash, and it helps the wash stay in the cracks really good, so you can use it like an ink. You should be able to find it anywhere that they sell art supplies. To make a wash I mix about 1 part paint, 2 parts water and 1 part matte medium. The medium is a little white, so it will lighten whatever color you're making a little bit.
|
|
|
|
 |
 |
![[Post New]](/s/i/i.gif) 2007/11/28 05:40:39
Subject: Re:My Baneblade Blog
|
 |

Longtime Dakkanaut
Long Beach, CA
|
I will DEFINATELY use this advice. Thanks a bunch.
|
"Do NOT ask me if you can fire the squad you forgot to shoot once we are in the assault phase, EVER!!!"
|
|
|
 |
 |
![[Post New]](/s/i/i.gif) 2008/02/29 06:45:56
Subject: My Baneblade Blog
|
 |

Hurr! Ogryn Bone 'Ead!
|
Very awesome.
|
|
This message was edited 1 time. Last update was at 2008/02/29 06:46:12
Orks are like those neighbor children who aren't invited to your parties and they come right in anyway.
 Veritas Crusade 2000pts Veritas Crusade 2000pts
 95th Krieg 'Blackguard' 3000pts 95th Krieg 'Blackguard' 3000pts
 Cadian 489th 2000pts Cadian 489th 2000pts
|
|
|
 |
 |
![[Post New]](/s/i/i.gif) 2008/02/29 14:14:31
Subject: Re:My Baneblade Blog
|
 |

Virulent Space Marine dedicated to Nurgle
|
that is a sweeeeet looking tank. I'm really glad that you posted about how you did the mud on the tracks. I have some ideas that I was throwing about and you just gave me the bit of info I needed to go ahead with it. Thanks 
|
|
|
|
 |
 |
![[Post New]](/s/i/i.gif) 2008/02/29 16:46:55
Subject: My Baneblade Blog
|
 |

Battleship Captain
|
Man, there's some threadromancy...
The mud's a great addition. And I love the way it looks like the commander is chewing out the stub gunner.
|
|
This message was edited 1 time. Last update was at 2008/02/29 16:47:49
Man, I wish there was a real Black Library where I could get a Black Library Card and take out Black Library Books without having to buy them. Of course, late fees would be your soul. But it would be worth it. - InquisitorMack |
|
|
 |
 |
|
|