The dakka articles system allows images and other files to be embedded in your articles, but ONLY images uploaded and hosted on Dakka will be displayed.
This means that:
- Images hosted anywhere besides Dakka (including photo hosting sites like Photobucket) cannot be displayed in an article.
- Images attached to your forum posts cannot be directly linked into an article.
ALL images you want displayed in an article MUST be uploaded using the 'Upload a File' link on the left OR linked from the Dakka gallery.
This is to ensure that all images in an article on Dakka will exist forever and will not, at some random time in the future, suddenly go offline when your picture hosting site changes their URLs or you let your account lapse.
Uploading an Image Directly to the Article System
You will need to have a copy of the image you want to upload on your computer. Click 'Upload a File' on the main, left hand navigation within the articles or army profiles section of dakka.
Under the 'Source File' field, click 'Browse' and select the file you wish to upload on your local machine.
Enter a name for the file in the next field. This is the name which will be used to reference the file from within articles so REMEMBER WHAT YOU TYPE HERE! If you type 'Necron Lord' here, then you can include the image in any article once it is uploaded by typing: [[Image:Necron Lord]]
The 'File Description' is just a space for you to enter some text to make it easy for people to find your image when they are searching for it. Some brief, descriptive text about the image is ideal here, such as 'A Necron Lord with a silver and blue color scheme'
Once you have filled out all the fields, click 'Save' to upload the file to the dakka articles system.
It is VERY IMPORTANT that you give every single file you upload a unique name (This is the 'name' you give to the file when you upload it, NOT the actual name of the file on your local computer).
If you upload a file and with the same name as a previously uploaded item, IT WILL JUST OVERWRITE THE PREVIOUS ITEM. So if you upload five images and name them all "Necron Lord" then you will ultimately only have one image uploaded to the system (the last one you uploaded).
To ensure that other users don't accidentally overwrite your images, you should always make sure to include your user name in the image title. For example, if I was going to upload several images of a Necron Lord I would name them "yakface-Necron Lord front", "yakface-Necron Lord side", etc.
Using an Uploaded Image in an Article
Note that these instructions are only for images uploaded directly to the article system. If you want instructions for manipulating Gallery images in your articles, please read here.
So you have uploaded the image to the article system and have remembered the name of the file. Now is the time to add it to your article, and there are many, many options....
You can add the image as-is, without any captions, rescaling, alignment, etc, by just typing:
[[Image:Your Uploaded Image File Name Here]]
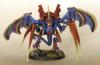
Example: I have an uploaded image titled: "yakTyrant1", which I write as:
[[Image:yakTyrant1]]
and we see:

This is useful if you've uploaded small(ish)-sized images (600 pixels wide or less).
Resizing Large Images
However, if you have uploaded large images direct from a digital camera, then this will look quite horrible and will stretch the page out. A solution is to resize the image by entering a number and 'px' after the image's filename, but separated by a "pipe" (a pipe is this character: | which is found under the 'delete' key on your keyboard when holding down the 'Shift' key at the same time).
Eg; here would be a 600 pixel wide image:
[[Image:Your Uploaded Image File Name Here|600px]]
This will resize your image to be 600 pixels wide which is the perfect size for looking good on all monitors (remember, many people might have smaller monitors and smaller resolution than you, so use 600 pixels, even if it looks a bit too small on your monitor!).
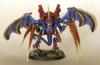
Example: Here is "yakTyrant1" resized to 600 pixels wide (you can see it is a bit smaller now):
[[Image:yakTyrant1|600px]]

It is entirely possible to resize any image to any size.
Eg; here's the same image resized be 100 pixels wide:
[[Image:yakTyrant1|100px]]
Advanced Techniques
Note that these advanced techniques work ONLY with images uploaded to the article system NOT for images linked from the Gallery. So if you want to use these techniques in your article, you'll need to upload the images to the article system.
If you're using images linked from the gallery, then use these advanced gallery image techniques instead.
Thumbnails

My Tyrant Conversion
If you want to create a thumbnail of an image, with a caption that is aligned to the right of your article, then put the following BEFORE the text that you want it to appear to the right of...
[[Image:Your Uploaded Image File Name Here|thumb|Some Caption]]
Example: Here is "yakTyrant1" as a thumbnail with "My Tyrant Conversion" as the caption:
[[Image:yakTyrant1|thumb|My Tyrant Conversion]]
Note that an easy way to create a Thumbnail is to use the 'Thumbnail' button in the editor.
Frames
You can put a frame around any image by adding 'frame' after the image's filename (Thumbnails have a frame by default so dont need it):
[[Image:Your Uploaded Image File Name Here|frame]]
Example: Here is "yakTyrant1" with a frame:
[[Image:yakTyrant1|frame]]
Captions
You can put a caption under any image you give a 'frame' just by writing the caption after 'frame':
[[Image:Your Uploaded Image File Name Here|frame|Your Caption Here]]
Example: Here is "yakTyrant1" with a frame and caption:
[[Image:yakTyrant1|frame|My Tyrant Conversion]]
My Tyrant Conversion
Realign Images
Sometimes you will want an image to align to the left instead of the right. Just add 'left', 'center' or 'right' to align an image to the left, center or right:
[[Image:Your Uploaded Image File Name Here|left]]
[[Image:Your Uploaded Image File Name Here|center]]
[[Image:Your Uploaded Image File Name Here|right]]
Examples of aligning an image 'center' and 'right':
[[Image:yakTyrant1|center]]
[[Image:yakTyrant1|right]]
Combining Techniques
Many of these techniques can be combined together simply by adding each one into the image code. Eg, you could align an image to the right, resize it, add a frame and a caption all at once:
[[Your Uploaded Image File Name Here|right|300px|frame|Your Caption Here]]
Example: Here's the same image we've been working with aligned to the right, resized down to 300 pixels wide, with a frame and a caption.
[[Image:yakTyrant1|right|300px|frame|My Tyrant Conversion]]

My Tyrant Conversion
Note that the order you write the commands can sometimes have different effects. Feel free to try different combinations out and 'preview' your changes to see what effects it has!
Preventing Text Flow
Using certain techniques (such as the 'thumbnail', 'frame' or 'right' alignment commands) will cause text to flow around the image, but this can be unwanted. If you want to make sure that text does NOT flow around an image, add this code after the image or last bit of text you want to appear alongside the image:
<br clear="all" />
Using this code both before and after an image will entirely prevent text from flowing around the image (which has been used for some of the examples in this tutorial).
Displaying an Image From the Gallery
It is now possible (and easy!) to link images directly from the Dakka Gallery into your articles.
Click here to upload your images to the Dakka Gallery , and follow the instructions provided on that page.
Once your images have finished uploading, go to the page in the gallery of the image you want to display in your article.
Scroll down the page and find the "Share This Image" section of the page on the bottom right-hand side. Copy the entire code out of the "Dakka Articles" field and paste it as-is into your article (there's no need to add any additional brackets or anything else).

Please note that when using an image from the gallery you CANNOT use any of the Advanced Techniques described above and instead must use (the more complicated) instructions provided below.
Resizing Gallery Images
To resize an image from the Gallery, you need to decide on the size you want to use before copying and pasting the code into your article. Going back to the image's page in the Dakka gallery and looking at the bottom right of the screen you'll see the 'Recommended Sizes' drop down menu.
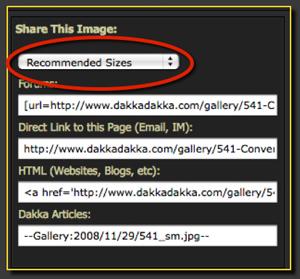
The default size displayed if you don't do anything is 'medium' (which is up to 600 pixels wide). You can change the size displayed by choosing one of the four pre-set sizes from the drop-down menu on the gallery page. However, this must be done BEFORE copying the code and pasting it into your article.
Here's an example of what the basic 'medium' image size from the gallery looks like (600 pixels wide):
-- Gallery:2008/11/29/500_sm.jpg --

600 pixels wide is the perfect size for looking good on all monitors (remember, many people might have smaller monitors and smaller resolution than you, even if it looks a bit too small on your monitor!), and that's why it is the 'default' size.
Example: Here is the same image but using the 'small' selection (320 pixels wide) from the drop down menu:
-- Gallery:2008/11/29/500_mb.jpg --

And here's the same image with the 'thumbnail' setting (100 pixels wide):
-- Gallery:2008/11/29/500_th.jpg --
The gallery even gives you the option to display the images at full-size, but we do not recommend you use this setting in an article as viewers will have a hard time navigating your article around the giant image.
Instead you may notice that all images inserted from the gallery automatically link back to the gallery page they came from, so if someone wants to go zoom in on the picture they can always click on the image and view it in the gallery.
Advanced Gallery Image Techniques
Note that these advanced techniques work ONLY with images linked from the gallery NOT with images directly uploaded to the article system.
If you're using images uploaded directly to the article system, then use these advanced techniques instead.
Using HTML
In order to manipulate images from the gallery in an article, you'll have to use html tags to make it happen. That basically means typing a bit of extra code inside of this type of bracket: < > both before and after the gallery image code you copied and pasted into the article.
Just follow the examples given below and you'll get it in no time!
Note that in all the examples below, when showing you the actual gallery code, I can't display it perfectly or else the image will show up onscreen. To get around this, I've put an extra space inside the gallery code as shown in this example:
--YOUR GALLERY IMAGE CODE--
Then I've modified it for the example by putting extra spaces between the dashes and the code like this:
-- YOUR GALLERY IMAGE CODE --
Please keep that in mind if copying and pasting my code for use in your own articles.
Realign Images
Sometimes you will want an image to align to the left instead of the right. Just add 'left', 'center' or 'right' html tags before and after your gallery image code:
<div class="imgleft">--PUT GALLERY IMAGE CODE HERE--</div>
<div class="imgcenter">--PUT GALLERY IMAGE CODE HERE--</div>
<div class="imgright">--PUT GALLERY IMAGE CODE HERE--</div>
Examples of aligning an image 'center' and 'right':
<div class="imgcenter">-- Gallery:2008/11/29/500_mb.jpg --</div>
<div class="imgright">-- Gallery:2008/11/29/500_mb.jpg --</div>
Adding a Border
You can put a border (also called a 'frame') around any image by adding 'imgthumb' html tags before and after your gallery image code:
<div class="imgthumb" style="width:320px">--PUT GALLERY IMAGE CODE HERE--</div>
Example: Here is the same image I've been working with, but with a border added:
<div class="imgthumb" style="width:320px">-- Gallery:2008/11/29/500_mb.jpg --</div>
Here's the tricky part about adding a border. You have to manually enter the width of the border in the code. You can see above that the width of the border is set to '320px' (which means 320 pixels wide).
I entered this value because I know from the gallery size drop-down menu that the 'small' size of image I'm using is 320 pixels. If I were to use 'medium' size (the default), then I would need to set the border size to be '600px' (600 pixels) instead.
If you don't enter the right size for your borders, they will look very, very strange (like this, where the border is set to 600 pixels wide but the image is only 320 pixels):
<div class="imgthumb" style="width:600px">-- Gallery:2008/11/29/500_mb.jpg --</div>
Captions
You can put a caption under any image you give a border just by adding what you want your caption to say immediatelyafter the gallery image code (but before the end html tag:
<div class="imgthumb" style="width:320px">--PUT GALLERY IMAGE CODE HERE-- PUT YOUR CAPTION HERE</div>
Example: Here's the same image, now with a border and caption:
<div class="imgthumb" style="width:320px">-- Gallery:2008/11/29/500_mb.jpg -- My Tyrant Conversion</div>
My Tyrant Conversion
Combining Techniques
Many of these techniques can be combined together simply by adding each one into the image code. Eg, you could align an image to the right, add a border and a caption all at once:
< div class="imgthumb imgright" style="width:320px" >--PUT GALLERY IMAGE CODE HERE-- PUT YOUR CAPTION HERE</div>
Example: Here's the same image we've been working with now aligned to the right, with a border and a caption.
<div class="imgthumb imgright" style="width:320px">-- Gallery:2008/11/29/500_mb.jpg -- My Tyrant Conversion</div>
My Tyrant Conversion
Please note that when you add a border to an image you can align it to the left (default) or right, but you cannot align it to the center...that can only be done by not including a border or by uploading the image directly to the article system and using the alignment techniques for those types of images.
Preventing Text Flow
Using certain techniques (such as adding a border or using the 'right' image alignment commands) will cause text to flow around the image, but this can be unwanted. If you want to make sure that text does NOT flow around an image, add this code after the image or last bit of text you want to appear alongside the image:
<br clear="all" />
Using this code both before and after an image will entirely prevent text from flowing around the image (which has been used for some of the examples in this tutorial).
Help!
If you need any more help, then please feel free to ask in the Nuts and Bolts forum (dakka user registration is required to post there)