| Author |
Message |
 |
|
|
|
|
Advert
|
Forum adverts like this one are shown to any user who is not logged in. Join us by filling out a tiny 3 field form and you will get your own, free, dakka user account which gives a good range of benefits to you:
- No adverts like this in the forums anymore.
- Times and dates in your local timezone.
- Full tracking of what you have read so you can skip to your first unread post, easily see what has changed since you last logged in, and easily see what is new at a glance.
- Email notifications for threads you want to watch closely.
- Being a part of the oldest wargaming community on the net.
If you are already a member then feel free to login now. |
|
 |
2006/06/17 06:00:41
Subject: RE: Stompa Gargant W.I.P.
|
|

Bonkers Buggy Driver with Rockets
|
sossorck: Yes, that's the one in Ramsey. I'm over in Ringwood, just off 287.
|
|
|
|
 |
|
2006/06/17 08:30:14
Subject: RE: Stompa Gargant W.I.P.
|
|
Dakka Veteran
|
jamsessionein, this is amazing. Awesome work.
|
|
|
|
|
2006/06/17 14:48:38
Subject: RE: Stompa Gargant W.I.P.
|
|
Dakka Veteran
Perrysburg, OH
|
With regards to working with Foam. Lowe's has a small spray on coating that you can use to coat the foam. It protects it from spray paint and regular paints. I have used it many times on all kinds of terrain and display boards. The can has pictures of foam shapes such as rings and cones on it. It is located in the spray paint section and is specifically made for this material. Talk to ya' later, Greg
|
- Greg
|
|
|
|
|
2006/06/17 17:32:54
Subject: RE: Stompa Gargant W.I.P.
|
|
Fixture of Dakka
|
have you seen the old Armorcast Mega Cannon. It kept the drum idea, but it was more like a wire rack that just held the ammo. I like that idea for orks. A grot would just role a shell into a big wire hamper and each progressive shell would just fall into the breach after the previous shell was ejected. ( think about a paintball gun if you get what I mean.)
|
|
|
|
|
2006/06/17 18:47:58
Subject: RE: Stompa Gargant W.I.P.
|
|
Bonkers Buggy Driver with Rockets
|
Cuda: Seen it, and been considering. Well, I've been busy prepping presents and such for father's day tomorrow, but I did manage to do a little bit more work to this thing's control grotpit.   Just some random bitz and machinery. The hole in the middle is for me to stick a grot engineer in later, maybe. I figure it helps break up the flatness of the back, anyway. I'm not too concerned with details as it gets closer to the top, as I am increasingly sure that it'll end up being concealed once the head is on anyway. Here's what I'm thinking for the rest of the interior: Grot 'captain' at the front center wearing one of those imperial comissar hats and 'steering' the gargant with a large boat wheel  One to either side of him working the levers - and an extra one getting in the way of one of the side grots, trying to clamber around him to the controls. Also, for reference, those circular magnets above the middle are the beginnings of the joint for the neck to attach to, so that I will eventually be able to remove the head for easy painting. I may just change the concept's plans a little bit and remove the upper arm section of the gun arm, so I have a shoulder-joint mounted cannon. Still thinking about that a bit - I tried foam and such, but I'm not a fan of the material and the way it cuts, so I'll probably wander around the hobby store looking at tanks and stuff until I find something captivating. ;P I'm thinking I need to put a flamer in this stompa's mouth for a little extra killyness. ;P I keep jumping around on this thing, but at least I'm making a bit of progress here and there.
|
|
|
|
|
|
2006/06/17 23:51:02
Subject: RE: Stompa Gargant W.I.P.
|
|

Dominating Dominatrix
|
AAAAAARRRRRRGGGGGHHHH!!!!!!
|
|
|
|
|
2006/06/18 08:52:07
Subject: RE: Stompa Gargant W.I.P.
|
|
Bonkers Buggy Driver with Rockets
|
Now, I want you guys to know that the grotpit is not near finalized yet. The grots are going to get a little more work done - these photos help point out mold lines I missed and the likes - and also, the captain's going to get a hat and maybe an eyepatch. Also, because my mother's a huge trekkie fan, she did actually name them. From left to right:  Cap'n 'Urk (Captain Kirk), Sprocket (Spock), and Snotty (Scotty). I may change their names around a little and add 'snotty' in as a grot sticking up out of the hole behind them, in an adequate pose to suggest that maybe he's yelling 'We'z cannae do it, cap'n! I'z givin' 'er all shez got!' - although it may be a bit of a tight fit. The grots are all removable at the moment so that I can adequately paint the interior unobstructed - they'll be glued in afterwards. Until then, they're free to roam around.  The cap'n does also have a peg leg, but I doubt it's discernable.  
|
|
|
|
|
|
2006/06/18 09:43:36
Subject: RE: Stompa Gargant W.I.P.
|
|
Regular Dakkanaut
|
Screw the haters - those grots look perfect in there.
|
|
|
|
|
2006/06/18 09:57:27
Subject: RE: Stompa Gargant W.I.P.
|
|
Dominating Dominatrix
|
could you please stop being so fraggin' good. that's really depressing. and don't forget to model "snotty" a larger belly. 
|
|
|
|
|
2006/06/18 12:45:37
Subject: RE: Stompa Gargant W.I.P.
|
|
Bonkers Buggy Driver with Rockets
|
Armored! Pending rivets now, and the armored skirting until I figure out if I'm going to use staples as the 'joint' that they hang from or not. And the chains and such, maybe a few extra hatches, you get the idea. Before plating it, I banded the plastic towards the bottom so that it would assume a sort of conical shape instead of cylindrical, with the plate's tops pointing in towards the grotpit a little bit to match the picture.  And then added plating and some battle damage    Next is a rivet job once I feel that all of the surface details I want have been added.
|
|
|
|
|
|
2006/06/18 14:10:22
Subject: RE: Stompa Gargant W.I.P.
|
|
Rampaging Carnifex
|
Nice progress ! I'm looking forward when you doing the head.
|
I know when it is closing time. - Rascal Mod
  
"Some people measure common sense with a ruler others with a potato."- Making Money Terry Pratchett
"what's with all the hate go paint something you lazy bastards" - NAVARRO
"You don't need pants for the victory dance." -BAWTRM
|
|
|
|
|
2006/06/19 04:12:17
Subject: RE: Stompa Gargant W.I.P.
|
|

Fresh-Faced New User
|
The modell looks amazing, great attention to detail and very close to the original.You've done a good job representing the "feel" of the miniature even in those parts not shown on the original art.
I've seen your many different designs for the right arm, and I think any of them would look great. But I do hope you are gonna add the saw to it also, it's just so orky, and would make it stay tro to the original art. Have you tried looking for real saw blades or gearwheels/sprockets? Motorcykle front sprockets would fit very well, though try to get a hold on some aluminum ones or it's gonna be front heavy. Maybe even bicycle rear sprockets would work?
Also, I don't think you shold go with a "shoulder mounted" gun, that's for dreadnouhgts... give the beast a right arm!
I like the work with the "grotpit", those little critters are always fun.
All in all, great looking model. I'm looking forward to the updates.
|
|
|
|
|
2006/06/19 10:28:01
Subject: RE: Stompa Gargant W.I.P.
|
|
Wicked Warp Spider
|
Ar, I thinks you be needin' a Ork Slaver Capt'n to show dem Grotz whos da Boss!
|
|
|
|
|
2006/06/19 12:13:47
Subject: RE: Stompa Gargant W.I.P.
|
|
Regular Dakkanaut
Vermont
|
Looks good all of it!
Check out the
http://www.the-waaagh.com/
See what the Ladz gotta say!
|
|
|
|
|
2006/06/19 13:03:55
Subject: RE: Stompa Gargant W.I.P.
|
|
Regular Dakkanaut
|
If you finish this thing, you're a shoe-in for a Golden Daemon.
|
|
|
|
|
2006/06/19 18:08:45
Subject: RE: Stompa Gargant W.I.P.
|
|
Bonkers Buggy Driver with Rockets
|
Well, it's a bit rough, but I think it looks good. Tricky to superheat metal hinges with a blowtorch and shove them in plastic. Took a little while, but I think the end result matches up to the picture suitably well. I haven't riveted or added glyphs to the armor plating yet - that'll probably come tomorrow. There's a little bit of cleanup on the holes that the skirt armor is hinged into that I need to do with an xacto knife, but other than that I'm pretty happy with the way it looks - now it has a more traditional gargant-esque shape to it, with only the feet visible (from the front, anyway. The back has no skirting, so the entire leg and mechanism is visible up to about halfway up the leg springs).     The grots aren't in the pictures for the moment as I forgot to put them in before the pictures. They'll still stay removable until final painting so I can get at all the cracks and crevasses. What do you guys think?
|
|
|
|
|
|
2006/06/19 18:34:46
Subject: RE: Stompa Gargant W.I.P.
|
|
Bonkers Buggy Driver with Rockets
|
Just for the scale of it, as well:   Should help place the gargant's scale for anyone having difficulty with it. It's small as gargants go, but it's a stompa through and through.
|
|
|
|
|
|
2006/06/19 18:35:04
Subject: RE: Stompa Gargant W.I.P.
|
|

Araqiel
|
What do you guys think?
I haven't been this impressed since Barph made his warhound titan.
You've really captured the GW art. Probably better than they could (Though they'd be limited by having to make molds for the thing...).
I wish I could use plastic card like you...
|
|
|
|
|
2006/06/19 20:50:36
Subject: RE: Stompa Gargant W.I.P.
|
|
Dangerous Skeleton Captain
Honolulu, HI
|
Dude your bits box must be the shiznit. This is so far past rediculous I need a new phrase to describe this. Here is a start:
You have a conversion Yahtzee!
The THAC0 of this in neg infinity.
Chicks will dig you because of your converting skills...there probably the best I know.
|
|
|
|
|
|
2006/06/20 07:38:39
Subject: RE: Stompa Gargant W.I.P.
|
|
Longtime Dakkanaut
|
I am amazed by the sheer awsomeness of this conversion!
|
Current Armies: Blood Angels, Imperial Guard (40k), Skorne, Retribution (Warmachine), Vampire Counts (Fantasy)
 |
|
|
|
|
2006/06/20 10:07:52
Subject: RE: Stompa Gargant W.I.P.
|
|

Regular Dakkanaut
|
all hail the doG of conversions!
Very suite stompa... i particularly like the little guys in the "cockpit" - and the idea of having an imp standing buy to reload the "big shoota" is also very cool.
One Q though, what is that white stuff you did it all with? and how did you cut it? - tell me you have a laser prototyping machine and i will cry.
|
|
|
|
|
2006/06/20 11:42:29
Subject: RE: Stompa Gargant W.I.P.
|
|
Bonkers Buggy Driver with Rockets
|
It's plasticard, a.k.a. sheet styrene cut to size. Just thin sheets of plastic that I cut with an xacto knife and glue into place. A laser prototyping machine would be fun, though.
|
|
|
|
|
|
2006/06/20 12:29:14
Subject: RE: Stompa Gargant W.I.P.
|
|
Bonkers Buggy Driver with Rockets
|
A few opinion questions for you guys that I'm interested in. I'm wondering firstly about suggested LED colors and secondly about basing. Now, let's talk about LEDs off the bat - there's going to be 3, as far as I can figure, all attached to the head. Two will be behind the eyes (one for each) and one on the underside of the jaw to light the grotpit. With that said, I'm trying to figure out what color LEDs I should use in order to come up with the appropriate voltage I'll need (certain colors require more juice than others). Keep in mind that I'll be painting the gargant a combination of faded red (red goes fasta!) and rusted metal.. so the eyes should be a suitable color. I don't think red eyes would compliment red armor well, but bright green might be an option. (As well as orange and such). I don't like the thought of blue LEDs for the eyes, though, as green seems more sinister. Yellow or orange could always be an option as the eyes are going to double as zzap cannons (Gaze of Gork) but I'm not certain. Also, what color should the LED be that lights the grotpit? I'm going to put it just underneath the head so it will illuminate properly, but I don't know if yellow is going to look silly or not. Red down in the grotpit might actually be appropriate (consider emergency lights or when they go to red alert in combat) I could always go with white, as well, but I don't know if that'd be too bright. Secondly, I wanted to discuss the base. I'm having a few complications as I'm thinking here - I can either make the base a small size, or a larger display size. Seeing as I'd like to play with the gargant, and as the flavor of the next few months is going to be cityfighting, part of me doesn't want the base to be more than 6" wide (to fit down some city streets and alleys). The gargant looks a little tight and restricted on a 6" base, though, and I can't add some of the things I was thinking of originally, such as a footprint with the flattened grot in it and an imperial guardsman fleeing for his life. Now, I could add all those on a base, but then it would start to get to be like a diorama and impactical for gaming.. I'm not sure what to do. Here's some pictures to show you the scale of things in base-terms.   The last option I have is to make a diorama base with a hole in it large enough to fit the 6" base of the gargant.. so that I could place the gargant in the slot and have it on a display base. I like this idea, but I don't know how to make the rubble look relatively seamless between the two pieces (gargant base and diorama base). It would be something like this: 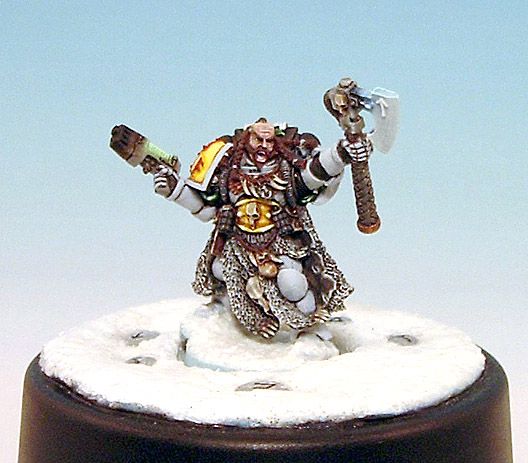 Note how you can see the mini on it's base slotted into the diorama base.. the only complication is that it's one thing to do it on snow or grass or regular flock, but I don't know how well rubble and urban mess will translate. Anyway, I'd like help with any of these above mentioned things. 
|
|
|
|
|
|
2006/06/20 13:01:25
Subject: RE: Stompa Gargant W.I.P.
|
|
Regular Dakkanaut
Pinon Hills, CA
|
I think you're asking in the wrong league, considering that people like me are even allowed to view and reply to this amazing thread.
|
"Plant more 'shrooms ladz, wez runn'n outta boyz" - RussWakelin, Grand Inquisitor |
|
|
|
|
2006/06/20 16:22:38
Subject: RE: Stompa Gargant W.I.P.
|
|
Grovelin' Grot
Dallas, Tx
|
Well, first of all, I would definitely keep the base to 6" or less. If you've made something this phenomemally cool, you simply MUST be able to play with it on the table. That being said, I like the diorama base w/ hole option. As far as breaking up the base/diorama transition, I would think with all the "noise" created by the rubble on an urban-ruin style of base, that it would actually blend better than with something smooth and consistent, like snow.
Also, since you asked, I like the idea of green eyes and a red light for the cockpit, just as long as you don't get any red-green christmas kind of feeling from it. It's kinda hard to know if that'll happen without seeing it though. I imagine it will depend mostly on the shades of the reds and green.
I'm a huge fan of this project BTW. I loved the concept art when I saw it, and you've done a great job bringing it to life. Can't wait to see it finished!
|

I'm really at my best when I'm at my worst. |
|
|
|
|
2006/06/20 17:01:11
Subject: RE: Stompa Gargant W.I.P.
|
|
Bonkers Buggy Driver with Rockets
|
Okay...I could use wiring help from any of you that are knowledgable. There are two LEDs that need to be bright green (the eyes), and one of them needs to be red (grotpit). As I understand, the green LEDs require ~3.3v (I think it's 3.3 for true green, and 2.2 for yellow-green.. so I might go with the 2.2v ones), while red are around 2v to power, so I think a conventional 9v battery would work fine for this project, and would actually prefer to use a 9v battery for the convenience of being able to easily change the battery (I have one of those top-clip things for it).
I want one switch to turn everything on - I flip it on, and it turns on the two green LEDs until I flip the switch back off. In addition, I also want the red LED to turn on, but I want it to flicker, erratically if possible - much like those busted out streetlights that flicker on and off at random intervals. Random intervals would be desirable, that is, although I don't know if that's possible. I'd prefer if the LEDs were around the 5mm size I'm used to (I think it's 5mm.. whatever your average LED is).
I have very little wiring experience, and in the past I've been very fortunate when my wiring projects actually turn on. With that said, I would really love to get some help with this - I have no idea how, or even if, the flickering of the red light is possible. What I do know, or rather, what I've heard, is that LEDs require resistors to keep themselves from burning out, but I have no idea what kind I need to get.
I would really love any help you guys could give me, as I'd ideally want to swing by radio shack tomorrow to pick all the stuff I need up. I can buy the LEDs themselves without a problem, and probably find a suitable switch, but I have no idea what kind of resistors I need or how to set everything up.
|
|
|
|
|
|
2006/06/20 18:33:04
Subject: RE: Stompa Gargant W.I.P.
|
|
Secretive Dark Angels Veteran
Baltimore, MD
|
Don't know if the color LED is available... but PURPLE eyes might look cool. Failing that... I'd say Yellow.
Grotpit light. Red.
I also vote for the diorama base with 6" removable portion so you can play with him.
|
Proud owner of  & & 
Play the game, not the rules.
|
|
|
|
|
2006/06/20 19:43:14
Subject: RE: Stompa Gargant W.I.P.
|
|
[SWAP SHOP MOD]
Barpharanges
|
RE: LEDs
If you want to run all of your LEDs off of a 9V battery, you'll probably want to have some resistors set up to have less voltage across the LEDs to limit the current going through them. To get only ~2V from the battery would require you to get two resistors and put them in a "voltage divider" arrangement, with one resistor connected to the positive terminal of the battery and the second tied on one end to the free end of the first resistor and its second end connected to "ground", in this case, the negative terminal of the battery. You'd connect another lead from the where the two resistors join to be the voltage lead to the LEDs. You'd need about a 2kOhm and a 7kOhm resistor to get about 2 V from the battery (the 2kOhm would be the one connected to the negative lead...look up Voltage Divider on Wikipedia if you need a visual diagram). If you go this route, try to get the fattest (you should be able to notice that some resistors are thicker than others) resistors you can as they can handle more current through them. It'd probably be easier just to use 2 AA or AAA batteries, though (and less soldering). I believe RadioShack sells some battery holders. Not positive on that though.
|
|
|
|
|
|
2006/06/21 07:11:35
Subject: RE: Stompa Gargant W.I.P.
|
|
Regular Dakkanaut
|
I'd go with red inside the grotpit as well. As for the eyes, I'd go with green or orange.
For the base, it seems to me that even if you went with a 6" base, all those extra details would be somewhat smooshed in there (technical term). The display base insert would definitely be the way to go. There still ought to be a fun thing or two on the actual base, though... perhaps the Mekboy in charge of maintaining it accidentally got snagged on one of the chains when the grots eagerly jumped in and took off, and now he's being dragged along behind..?
|
|
|
|
|
2006/06/21 13:12:49
Subject: RE: Stompa Gargant W.I.P.
|
|
Longtime Dakkanaut
|
The only reason the base insert would detract from the diorama feel is because the base is tapered to a larger diameter on the bottom. This, of course, leaves an indented ring around the mini which kind of ruins the look. So, as I see it there are two options:
1. Use a straight cylinder base with no taper that can fit snugly into your diorama base (good)
2. Use broken up pieces of the street to overhang slightly off of the base. Then, have a hole in the diorama base that conforms to the shape of the overhnging street section. Use Rubble, manholes, or craters to hide the seam lines between the stompa base and the diorama base. (Better)
I wouldn't suggest that much work but you definitely have the skill to pull it off.
|
|
|
|
|
|
|
|


