Objectives
- Build trench templates suitable for a game of Warmachine.
- Build them in large quantities.
- Build them fast.
Game Rules and Design
Trench templates aren't really meant to be terrain in the Warmachine: Prime rulebook. On page 88, the rulebook states that trenches represented by 3"x5" templates that are designed to be layered to create trench networks.
Models only benefit from trenches if they're completely within the area of the trench and while completely within them they do not block line of sight to models not completely within a trench. They're also immune to blast damage if the center of the blast template is outside of a trench template they're standing in.
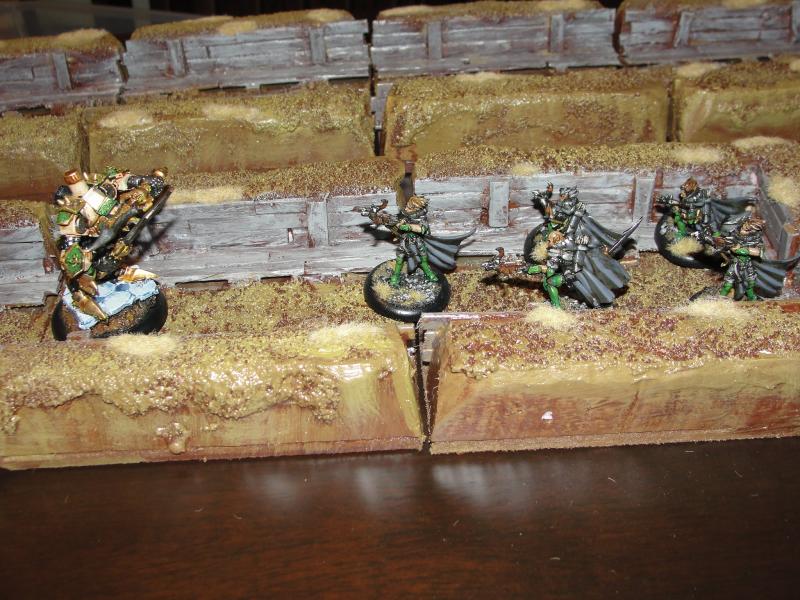
These trenches have 3"x5" interiors that are meant to hold models. On either side of the trench there is wooden framework holding up the earth, which are the parapets. From a practical standpoint, the parapets are not meant to be elevated terrain but are a necessary abstraction for this construction.
On the ground, both sides of the trench are planked with duckboards, that way the trench can be used facing either way.
I considered a few designs where the connections were angular, but I didn't want to lose the 3"x5" template from the rules, so I stuck to right angle connections. Models inside these connectors would not benefit from trenches.
Construction
Materials Used
- 2'x4' panel of Hardwood
- Marker
- Jigsaw (Probably a table saw would be better, it's all straight cuts)
- 1" pink insulation foam
- hobby knife
- wood glue
- Wire Foam Cutter
- Spackle and Scraper
- 1/4"x 1/8" Basswood strips
- Packs and Packs of Woodsies Skinny Sticks (pre-cut wood strips 3/32" x 1/8")
- Hobby Saw
Layout

I started by laying out all the templates I wanted to get out of the hardwood. The center of each template was 3x5, and whatever I considered the parapets added 1" to either side of the trench. You can see all the places where I expected parapets to be by the shaded lines.
So for a 3x5 trench template, each base was 5x5 to account for the parapets.
The larger trench pieces are command trenches, so those pieces were 7x8 to account for the parapets.
Using the saw, I cut all the pieces out of the hardwood.
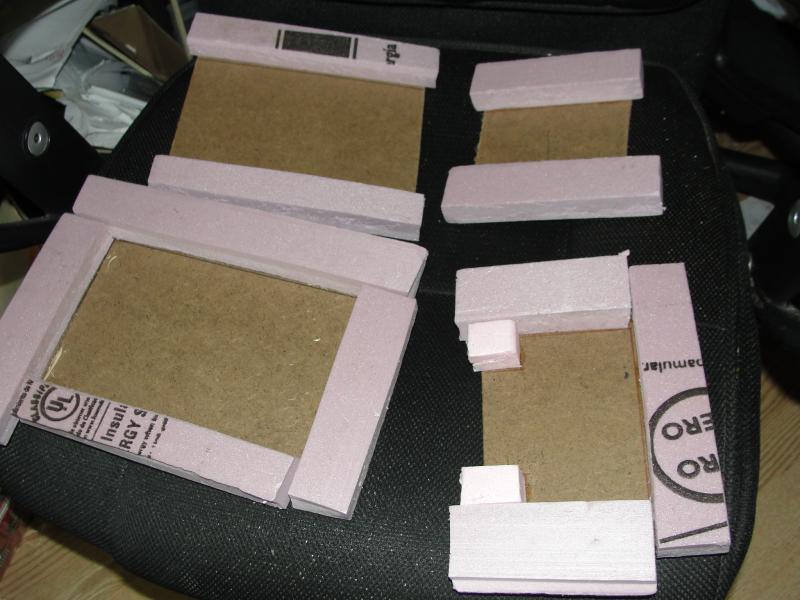
When cutting the insulation foam to place the parapets around each trench template, I simply eyeballed anything larger than an inch and cut as straight a line as I could with the hobby knife. Remember, I was going for speed here, so careful measurement at this step wouldn't really be helpful.

I cut the oversized pieces down by using the wire foam cutter. Because the pieces hung over the hardwood, I simply used the hardwood as a guide and ran the wire against the edge of the base.

You'll notice a slight curvature to the parapets. I made the cuts as vertical as possible so that a miniature could comfortable sit atop them. Cutting too deep an angle, I've found, makes for some precarious model placement.
The first cut I made was almost completely vertical, with small wiggles so the trenches wouldn't look completely blocky. Then I cut a very shallow decorative curve in the top and at the corners to create the illusion of something more natural than insulation foam.
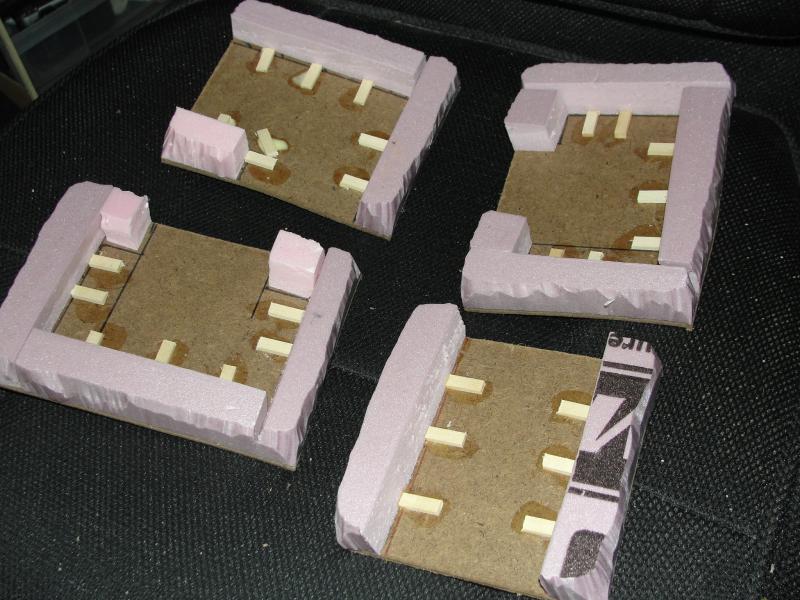
This part is optional, but I liked the effect. I elevated the duckboards to create the illusion of drainage in the center by cutting 3/4" lengths of 1/4" x 1/8" pieces of basswood and lay them out wherever I was going to lay duckboards.
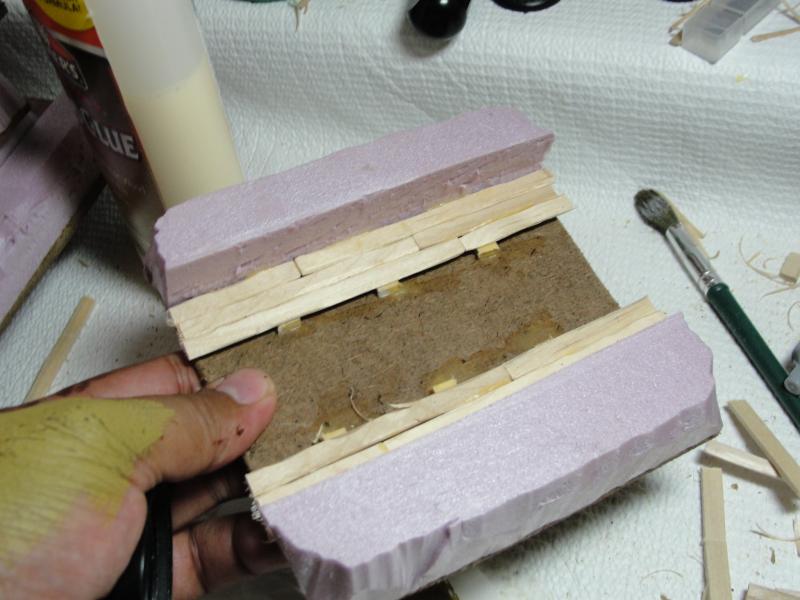
I cut the skinny sticks to various lengths and lay them across the supports. I tended to cut the skinny sticks into 3"x2", 1.5"x3.5" and 5" lengths to create visual variety.
Short, even length boards that run across the trench might make more sense, but laying down the duckwalks this way made cutting the boards faster as I was cutting far fewer pieces.

For the wooden framing, I cut boards to the same lengths as the duckwalks and glued them to the sides of the trenches.
In this picture you can see a step I didn't mention, and that was weathering the skinny strips. I used a medium use blade hobby knife to shave corners and gouge out the skinny sticks which added more variety to the trench pieces. It's a time consuming step, however, so it can easily be skipped

The wooden framework is completed by cutting 3/4" lengths of the 1/4"x1/8" of basswood. These pieces, too, are weathered with a hobby knife (unnecessary, but pretty).
This particular piece has foam pieces that leave gaps between them. I filled those gaps in with spackle.
Note: The presence of these support boards may have a limited impact on how many models can completely fit within a trench, however, I like the look so I went for it anyway.
Painting
Materials Used
- White Glue
- Sand
- Glidden paint color Nutmeg
- Paintbrush (duh)
- Water based wood stain tinted Rosewood
- Foam Brush
- Vallejo Desert Yellow
- Folk Art Medium Grey
- Folk Art Slate Grey
- Sealant of some kind
- Woodland Scenics mix of Harvest Gold and Wild Honey static grass
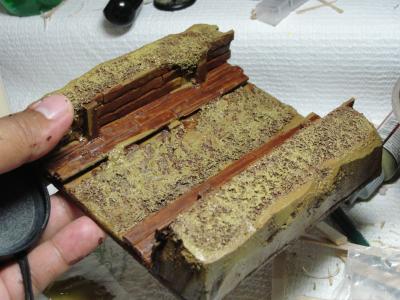
Pre-painting
[Image:malfred-warmachinetrenches-09|800px]]
I terrain the way I paint my models. Before I touch them with primer, I put down the sand or gravel. In this case, I applied sand by brushing on watered down white glue. If you don't water down the glue, the sand will clump. I have one set of dangerous trenches that has clumps of sand.
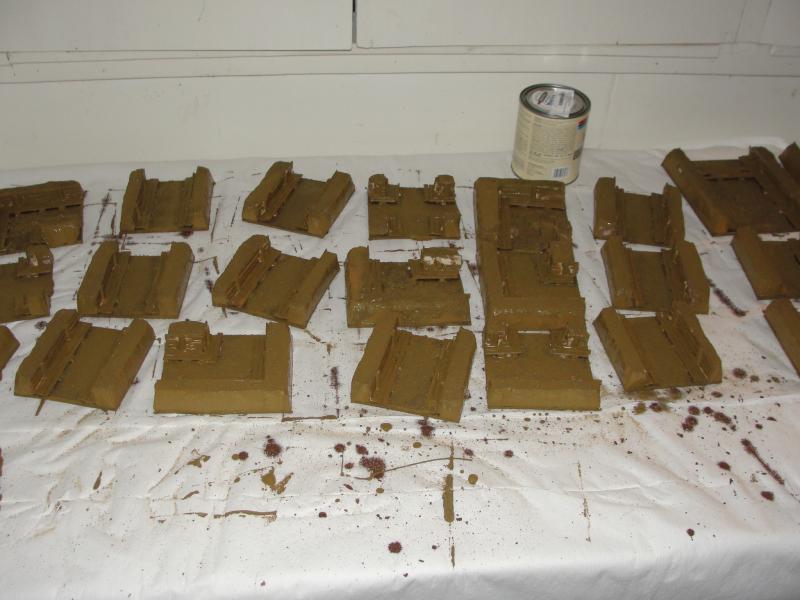
I only needed 1 quart of the house paint to paint 150 trench pieces. A key thing is to use a paint pourer of some kind to conserve paint. You'll need more paint to get the sandy portions, but it really isn't that much.

Using a foam brush, I applied a water based wood stain. You can get this in different shades by bringing a water based woodstain base can and requesting a color (Oak, Walnut, etc.) For most of my terrain, I use Rosewood.
I like the water based stains because they are easy to cleanup and they don't stink so bad. Plus, I do this stuff in my basement, near a furnace, so flammable odors is probably a no-no.


After the wood stain dried, I put out more Nutmeg paint and did a light highlight. While wet paint doesn't necessarily drybrush, it's a similar technique, and the advantage of having sand and other raised surfaces on your terrain will help you catch paint for highlights.
I used three final drybrushes. Vallejo Desert Yellow for the sandy parts and parapet edges, Folk Art Medium Gray and Folk Art Slate Grey for the boards.
Folk Art is a crafter's paint. I've also used Ceramcoat before (Hippo and Rain Grey). This stuff is cheap, and perfect for terrain. If I was better at color matching, I'd probably have an alternative to Vallejo Desert Yellow.
I tried to use static grass to break up the monotony and to cover up any streaky paint, exposed foam, etc.
A Note on Assembly Lining
The most time consuming processes was laying the duckboards. One way to speed things up would be to pre-determine the lengths of duckboard you'd need and asking a bunch of people to do all the cutting.
They'd probably rise up in rebellion against you after the first 50 cuts or so.
Another way I saved time was that I didn't start painting until I had a good chunk of templates completed.
Then when I painted, I'd prime the first set (about 23-30 pieces).
While that dried, I built more trenches.
After it dried, I'd stain that first set and then built more pieces.
After the stain was dry, I'd prime a second set and then go back and use the paint to highlight the first step.
And so on.
It's all about making the downtime as productive as possible.
Conclusion

Here's a completed set.
Let me know in the comments section or by pm/email if you have any questions.