This is to archive this thread for easy reference. http://www.dakkadakka.com/dakkaforum/posts/list/213123.page
There are several methods used. It all depends on the raw materials you wish to use.
Kid Kyoto chose to make his from a Cadian flamer, and a plasma pistol.

Per his notes:
I chopped off the cadian flamer nozzle, chopped off the plasma pistol up to the ribbed vents. Glue and viola! Plasma gun.
Necros crafted his from the basic lasgun, and a plasma pistol:

Per his notes:
In the cadian box there's 1 lasgun arm without a hand molded onto the front.. so you take that gun and save the empty hand arm to hold onto the gun.
Get your SM plasma pistol and cut off the back of it right along the rear side of the coily part. Then you take that lasgun and cut off the front part, right along the front of the ammo cartridge part. Then you glue the pistol to the lasgun and use a teeny bit of greenstuff to smooth out the seam and also fill any liitle hole you might get on the bottom side of the plasma gun.
And there ya go. Quick and easy "light plasmagun"
Bubber came up with this one:
you can just about see where i trimmed the plasma pistol in to a locking 'L' shape and cut the lasgun to suit. sorry for the image quality - mobile phone.
Moon46's advice was very good. A marine/catachan flamer + a Plasma pistol is all one needs. See for yourself:
No notes with that one, but at least the diagrams are crystal clear.
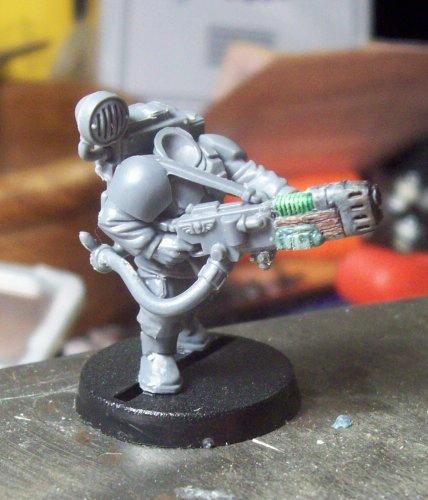
Inspired by the above methods, I made some plasma guns of my own. I used the Cadian Flamer, the pipes from the cadian flamer back pack, and the Cadian Vox pack, and a bit of greenstuff. I'd recommend using polystyrene cement, as opposed to superglue, as the cement doesn't set immediately. You need time to fiddle with all the piece to make them look right.
1. I cut off all the antennas
2. Then I clipped the nubs on the bottom of the vox off, and sanded the bottom down so it was nice and flat.
3. I then used a sharp hobby knife to slice the pipes off the bottom of the flamer pack-back, keeping as much of the pipes as possible.
4. I then cut the front of the flamer off. I also cut the back portion of the plasma pistol off, and cut off the plasma cylinder for later use. (See moon46's diagram).
5. The plasma gun was then checked to see if it lined up well with the flamer, and if it did, it was then glued in place, and then left to set for about 15 minutes.
6. Please note that there will be a gap where the plasma pistol's grip used to be. I green stuffed a grip there (see picture 1). You'll also note the plasma cylinder glued to bottom of the new gun as well.
7. Glue the back pack on, let it set. Then polystyrene cement the pipes to the bottom, the gun's hose into the pipes, and the gun arm to the cadian.
8. Insert a minute of fiddling with the positioning here. Once it's right, glue the flamer handle arm to an approprite place, and you're done. I found next to the green stuffed handle worked. I also had to clip the handle down just a wee bit to get it to look right.
9. Fill in any gaps with green stuff.