Written by: Dashofpepper
Hey folks!
For those of you who don't know me, I play Dark Eldar. My hope for this thread and what it becomes is to be around for a long time and to be read by people even after I've forgotten about creating it. I've always been blunt, and will do so now: As you read this thread and weigh the value of what I write and compare it to what you may read elsewhere or in contention to my own thoughts, I ask that you consider my successes when contemplating my thoughts. So take the following thread and the advice that I've taken the time to write in the spirit in which it is given: Trying to help other Dark Eldar players emulate my success.
This article is my attempt at an “Advanced Tips and Tricks” for Dark Eldar players to step up their competitive abilities. I’m not going to talk about fundamental list creation (though I will touch on it a bit), unit comparison, how many lance weapons in an army, what units work best with which other units….those things have all been discussed (or are being discussed elsewhere), and what I’m writing here will be most beneficial if you have already read the following three threads:
Generalized DE Advice
Wych Cult Advice
Kabal Advice
Some of what I discuss will be a rehash of something I have discussed elsewhere – because some things are important enough to repeat. As the title says, this thread is about winning with Dark Eldar. It does not say, “How to have fun with Dark Eldar” or “How to create an enjoyable game with Dark Eldar.” If you aren’t hungry…if you don’t feel a primal urge to eat red meat with your bare hands and lick the grease from your fingers…if you would rather turn the other cheek when you get hit instead of escalating the confrontation into brutal destruction for your enemy, this guide is not for you.
The original forum thread, including quite a bit of feedback from others, can be found here.
State of Mind
This is the first part of being successful with Dark Eldar – starting a game with the right state of mind. My list-creation advice always echoes the same sentiments – things like, “The best defense is a good offensive,” and “Every ablative wound you take is killing power you’re losing.” That list creation mentality of “KILL KILL KILL” needs to effectively translate into your mindset for your success in a game of 40k. Before you start rolling dice, get angry. Not angry and unsportsmanlike…more affronted. It is beneath your dignity to have to mutilate unworthy opponents. They should voluntarily subject their souls for your pleasure, not inconvenience you by making you waste your time taking them.
I write this first because it is the most important. Mentally visualize how every enemy vehicle is going to explode. How you are going to viciously table your opponent without taking a single casualty. Completely focus your thoughts on utterly annihilating your enemy from the table. And they ARE your enemy. For the 2-2.5 hours of the game, your friend/opponent/stranger is NOT your friend. They were rude enough to challenge your supremacy on the table-top, and deserve extinction. Every tank you kill should send a joyous thrill through your temporarily black heart. Every model you kill is your enemy’s just desserts for the sheer audacity in wasting your time. When you enter a tournament, you should be morally outraged that they didn’t just hand you the prize support at the beginning to save them humiliation at your hands on the table top, and trembling with anticipation to repay such an insult with a vengeance.
This serves two purposes.
- It puts you in the right frame of mind to examine how to cause the maximum damage to your opponent, which works in conjunction with the same effort you should have put into your list, figuring out how to create maximum killing potential. No…you should NOT have five trueborn in that venom if they only have 4 special weapons.
- It keeps you focused on killing. Every vehicle you lose needs to redouble your fury and desire to wipe the board clean of your enemy. Dark Eldar are not objective campers. They are not reserve or deep-striking utilizers. We do not sit in cover on an objective and waggle our tongues at inferior species. We do not need to do anything other than present ourselves squarely on the battlefield, DECLARE that we own it, and laugh in the face of anyone who has something to say about it. We eviscerate them with darklight, poison and blade. I’ve said this before and will again no doubt, but the answer to “Don’t you think you should take a 5 man warrior squad to camp at least one objective?” is a simple and stark “NO!!” We are killers. If you are a Dark Eldar player, you are a KILLER!
Every point in your army should be focused on killing. Every thought through your head about your army should be focused on killing. For the 2-2.5 hours of that tournament game, every molecule of your being needs to be the antithesis of your enemy, terribly and violently focused on absolute destruction and demoralization of your enemy.
Now, with that said, I again must reiterate that this is not synonymous with bad sportsmanship. You should not growl at your opponent across the table, or bite them, or brandish weaponry. Smile, joke, be friendly. But you must *NOT* be distracted from the razor edge mindset that you’ve willed yourself into that is completely focused on ruin and the suffering of your inferiors. 40k should be, and *is* fun. Winning is fun, and tabling your opponent without losing a single model is absolutely giddy. It is NOT your job to make your opponent have a good game. It IS your job to make your opponent feel like they are being destroyed by a gentleman. Whether their ego can tolerate unequivocal destruction of their ability (or inability) to create a list, and the mockery of their tactical skills on the table or not is NOT your problem. If they are good sports, they will accept the humbling gracefully, and possibly learn something. If they are bad sports, they will grumble, swear, and/or be sullen about the abuse you inflict on them. Again, NOT YOUR PROBLEM. They shouldn’t have affronted you in the first place by making you spend the time destroying them. If they had conceded at the beginning, you two could have gone and had a drink and chatted together. They should have KNOWN that Dark Eldar are indomitable.
Don’t smack-talk. Last weekend my friend was smacktalking one of my opponents on my behalf, and said, “The best kind of smacktalk is the kind someone else has to back up.” It was funny, but in terms of sportsmanship, don’t do it. You must be utterly confident, completely vicious, absolutely focused on killing, killing, killing. I go through this ritual before every single game. I mentally visualize violence, focus my every thought on how lethal I need my army to be and keep that intense focus throughout the entire game.
This section of my guide on winning with Dark Eldar isn’t a be-all, end-all of Dark Eldar tactics – it is meant to prepare you mentally for HOW to play and how to approach each game, not what moves to make in a game.
Deployment Choices
So you’re at the tournament, you’ve been listening to Mudvayne, adrenaline is coursing through your veins, you’re sweaty with it, murder is in your mind, and the corners of your vision are throbbing red with rage. You’re ready to translate that anger onto the tabletop.
Now comes the single most important dice roll of the entire game: The roll for deployment option. I could write two pages on this dice roll, the ramifications it has on your game, the psychology involved in the result….probably more than two pages. My premise of Dark Eldar as an army is as a lethal, horrific force capable of inflicting game ending casualties in the first two turns. Truthfully, most of my games are decided by the first dice roll of the game – the roll for deployment. If I win the roll, the game is pretty much over. If I don’t win the roll, its going to be a real game. With this in mind, I want to talk a moment about lists – Baron Sathonyx adds +1 to your roll to go first. I’d go so far as to call him mandatory in every Dark Eldar army, every iteration. He’s not in my wych cult – only because I haven’t figured out what to do with him in it yet. He’ll end up there. For a Dark Eldar player using a codex that screams “Glass Cannon” getting in that alpha-strike is just that important. Getting the first turn is a boon to the alpha-strike – significantly.
You either won the roll to go first or you didn’t.
If you won the roll
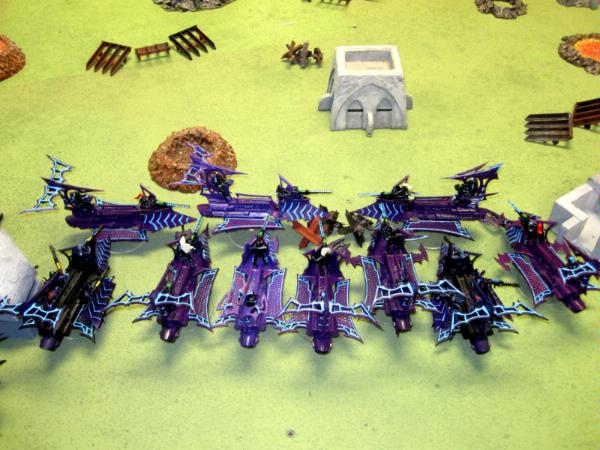
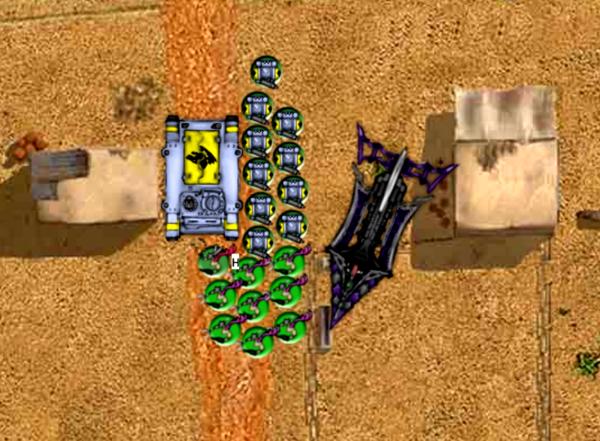
If you've read the threads linked at the top and heeded basic list advice, you have the tools and attitude in your arsenal to murder your opponent. Deploy centrally. Deploying across your deployment zone to have firepower in range for wherever your opponent might deploy is a mistake - deploy centrally with the ability to move straight ahead, left or right towards your enemy. Here's a sample deployment:

I haven't written any battle reports since the new codex came out, but not much changes in deployment style. Centrally deployed so that I can threaten anything on the board as quickly as possible. Vehicles turned sideways are important - with careful positioning they can give cover to the things behind them by obscuring 50% of the facing of other vehicles - which are incredibly narrow profiled and not hard to do - and having a free rotate means that when you move 12" forward and rotate, you get about 3" of extra range - to disembark out of 2" into cover or in preparation of attempting to fleet and assault. With ravagers now having aerial assault and a full 12" move while still being able to fire all weaponry, their central position is not as important - they have 12" of movement and 36" range - I generally deploy one on each flank (utilizing cover if possible) and one centrally - so that I'm threatening the middle and ensuring that an attempt to deploy on a single flank doesn't put me out of range of firing at enemies. In a spearhead deployment, still deploy at the very front. For Dawn of War, everything of mine goes into DoW reserve and comes in on turn one - generally somewhere between 18-24" depending on the board, enough to get a flat-out save, and depending on the amount of firepower the enemy has, far enough back to challenge their Nightfight rolling.
Additionally, choosing sides is critical. The side or quarter I choose is the one that I believe will be *least* favorable to my opponent. I don't really care what is in my deployment zone because I'm coming for the fether across the table hard and fast. I want them to benefit from as little cover as possible to maximize my killing power.
Objective placement: Some people favor placing objectives as far away from each other as possible to capitalize on the DE ability to get to them with greater speed than the enemy in the late game. I don't. Objectives go 12" away from each other (which is as close together as they are allowed), and as centrally as I can get them. I *want* the game happening in the middle of the table, I *want* my enemy deploying with objectives in mind, right across from me. Even if I don't get the first turn, if objectives aren't fixed, they're going 12" apart, in the middle of the table, as close as I can get them. If the enemy puts one in the very center of the table, mine will get 12" from theirs towards my deployment zone.
If you didn't win the roll
The game gets trickier. There is no standard "Reserve vs. not reserve" answer that I can give here. It depends on two things:
- Terrain and Placement: If terrain is plentiful, and arranged such that a forward deployment will get me cover for the majority of my army (or that it will give some of my army cover while the rest of my army gets cover from the parts getting cover) then deploying on the table is still a consideration. If terrain is such that you need to deploy mid-to-rear of your deployment zone....such that even if you survive the enemy first turn relatively unscathed your assault units won't make it in on the first turn and your trueborn will be out of range, then reserving becomes more of a consideration.
- Enemy list: How much ranged firepower they are packing is the other half of the equation. If there is enough ranged firepower to reliably kill 1/3 to 1/2 of your army in their first turn....then reserving is more likely a better situation.
In general, reserving is *not* a favorable situation for Dark Eldar. Trickling in piecemeal onto the table is never the preferred option to bringing the full weight of your army to bear, but if cover and deployment areas, and the enemy list and deployment don't give you the feeling that you can survive well enough to hit back as hard or harder as they're going to hit you, then reserve. The one very positive thing that Dark Eldar have going for them now that they didn't have in previous editions is the range of firesupport. Lances are still 36", but we now also have splinter cannons - which are also 36". When you move in from reserve, you are *still* going to get the alpha-strike, just at reduced capacity to what a full deployment would give you.
There are additional benefits to having such a threatening army on the table. Opponents will reserve *their* armies or pieces of their armies even when their army is not at an advantage to do so. If you're going first, that's two free turns of unequal combat in which a Dark Eldar general with an army and mentality focused on lethality can decide the game in.
Additional notes on enemy reserves
- If your enemy reserves their army and isn't skimmer based, make sure that when their turn 2 starts, your entire army is flat-out, and that *everything* has a 4+ save regardless of its position on the board. Additionally, play around with your vehicles, their contents and a table edge. If you have enough vehicles, you can line their table edge in two turns - at which point non-skimmers are automatically destroyed. While the GW FAQ 1.1 allows players to tank shock onto the board, it also notes that if a unit stops with any part of it off the board, it counts as destroyed. A rhino attempting to ram a skimmer from off the table stops 1" away from the raider to resolve the ramming attack. IE, it has stopped and is still not on the table. Personally, if my opponent fully reserves in this situation and hasn't inspired my ire with a bad attitude thus far (while the game is beginning), I'll tell them what I plan to do after they announce that they are fully reserving, show them the FAQ and the clarification if it comes up, and tell them that I don't want to win like that - so ask them to deploy on the table anyway.
- If your enemy *is* skimmer based (Eldar and Dark Eldar) you can use roughly the same strategy - except that you flat out your vehicles in a checkerboard pattern *near* their table edge. I don't have a picture of this to show, but the goal is for enemy reserves to not be able to move onto their table edge, and have to fly over you to get onto the table - more than 12", so that they don't get to fire anyway. Alpha-strike denial. :D If you haven't done this before, play around with your models near a table edge to get a feel for the pattern and unit dispersal you need to accomplish it. Dayve110 added a sample picture on page 2, which isn't quite what I was after...the picture I'm trying to draw would look like a large scale of this:
-- __ -- __ -- __
Basically, picture a wave serpent. 5-6" long? Roughly the same across? Checkerboarding across the enemy backfield is putting your vehicles down in a pattern that doesn't leave enough room for a wave serpent to deploy onto the table and still be 1" away from you. IE, 6-7" gaps. I'd have to get out models and set this up to get exact dimensions...but If you have a wall of vehicles roughly 4" from the board edge, roughly 4" apart from each other(ish), and a second wall offset to the first one several inches behind the first one, there are big gaps between your vehicles, but none big enough to fit a wave serpent while staying 1" away from all your stuff. The second set of vehicles in the offset pattern don't need to flat-out to get there on turn two in most instances, so you can actually deploy infantry to help gap-fill - troops that can't be tank-shocked without ramming a vehicle in the first row....which can dodge on a 3+, and which would remove the wave serpent and its contents from play if it didn't explode your raider. If I'm motivated I'll set this up on a table and take a picture of it in the future. Reserve denial, call it the Dash Denial, whatever. :)
And that concludes Deployment Tactics. Deploy centrally, maximize your threat capabilities, only reserve (and alpha-strike from reserves) if you absolutely must to survive, and deny the utility of enemy reserves.
If you *do* reserve, don't attempt to seize the initiative. While first turn is preferable, if you don't get it, keep the second turn. If its an objective game you'll have the last say in controlling objectives. In a killpoint game, you'll have the last say in trying to finish off units for killpoints.
Capitalizing on speed
The best lesson I can communicate here is that theoretically knowing how fast your opponent (you) can move is not the same as accurately anticipating or reacting to it. Knowing that wyches can theoretically reach out and assault 30" away, or that trueborn can reach out 36" doesn't mean that your opponent can eyeball distance and judge accordingly to stay out of range. Alpha Strike! There are four pieces I'd like to talk about.
Movement to deploy for alpha-strike
Your raiders and venoms have a 12" movement, a free rotate, 2" of deployment....and then either firing or fleeting to assault. As a general rule of thumb, if exposing yourself gets you a shot or the possibility of an assault, take it. If you can move a vehicle 6" to fire the contents at a good target, take it. If your choices are 6" of movement to fire at a poor target or a 7"+ movement and disembarkation (into cover if possible of course) to fire at a better target, take the latter. While you are exposing yourself, you're creating more targets. A vehicle with trueborn in it that explodes is probably a couple of dead trueborn. An empty vehicle with trueborn deployed in cover 2" away from it is two targets instead of one; better for you by far. The only exception worthy of note...flamers. Hull-mounted flamers, chimeras with flamers in them, immolaters, and Baal Predators (and anything not listed here that can reliably get into range to kill your entire unit while ignoring cover). One of my favorite tactics when cover isn't available on a move (or terrain angle doesn't allow, such as buildings) is to use vehicles as mobile cover. If you have a squad of 5 warriors and one blaster in there...stick the blaster out front to get your 18" range shot, and space the other warriors out at the 2" coherency mark and wrap them around the vehicle so that they get cover in case they get shot at.
If you pull off your alpha-strike and neutralize a significant portion of your enemy, consider getting back into your vehicle the following turn if you can move up 6" to take shots at another target.
Fleeting and assaulting
Much as above in terms of capitalizing on speed. While your enemy probably can't accurately assess 30"...YOU can - in pieces. Examine where your enemy deploys in relation to their deployment edge. In turns where you don't have clear-cut borders....you only need to eyeball 6-12". Drop a dice at the base marker of the vehicle you're going to move, and move it up 12" towards your target. Eyeball whether you think you can move it or not. If you're not very good at gauging even short distances like that, then measure out 24". See where it gets you. If you want to assault a unit that you think 24-30" away and haven't learned to gauge distance yet, measure out your 24" flat out movement. You're not required to take it. In a friendly game...while legal it may incur a frown from your opponent. This guide is to teach you to castrate people in a competitive environment. Use the tools at your disposal. With practice, you'll learn to eyeball that last 12" or so accurately.
To try the assault or not: If you don't have to assault through terrain...go for it. Wyches, wracks, grotesques...whatever your assault unit is, get in that alpha-strike. If you're going to have to assault through terrain, make a judgment call. If you need 5-6" to get in the assault, its probably better to flat out your vehicle than to risk an assault you won't make. 4" or less....on 2d6, sure. If you have multiple units going after the same target, then it is situationally worth risking needing a 5-6" on 2d6 with them; someone is going to get in.
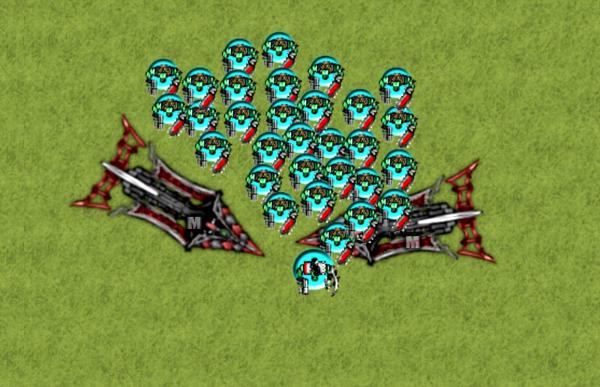
Here's an example of using your speed, open-topped vehicles, and profile to get an assault in.
You deploy on the 12" mark in a pitched battle deployment. Your enemy does the basic math. 12" move, 6" assault, possible 6" fleet, 2" disembarkation...so they disembark 3" behind their deployment line just to make sure you can't get in the alpha-strike.

You get a free rotate during your movement phase. Rotating gives a 2.5" bonus!

A 12" movement closes the distance.

You can disembark anywhere within 2" of the hull. My first model gets out as far forward as possible.
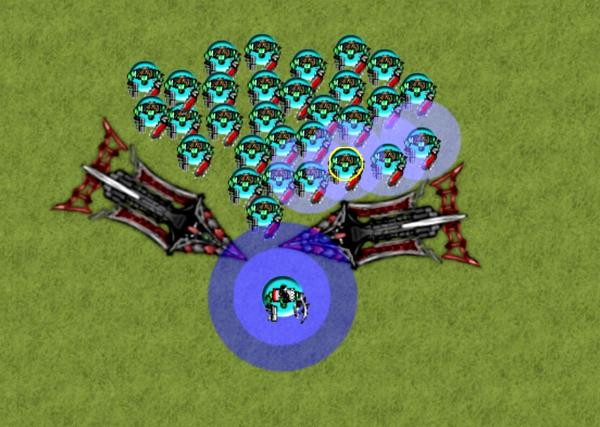
My wyches fill in, keeping the 2" disembarkation rule followed - I deploy centrally and forward to get as close as I can.
I roll for fleet...and get a six! I'm 9" from the enemy chimeras, so I need to roll at least a 3+ in order to make it into assault. But if I get even a 3", all my wyches will get into 2" of the first model, so I'll still get all my attacks.
Closest to closest - the middle chimera is my primary target. In hindsight, for ease of spreading out, I probably should have made the right chimera my primary target but I didn't.
Next I declare my secondary target - the chimera to the right, and I assault in, keeping 2" coherency with a model that has already assaulted in.

One wych fills in within 2" coherency of the first model to give me 2" of coherency range to get a tertiary assault. I chose the wych that I did (close enough to provide coherency, but not the closest to my tertiary target) to make sure that I'll be able to get in with my tertiary target here.

And now I hit my tertiary target.

And with all three of my targets assaulted, I fill in however I want - provided that each model I move gets into base contact if it can.

I throw some haywire grenades! The chimera on the left is shaken and weapon destroyed (from 4 grenades), the chimera in the middle is is shaken, weapon destroyed and immobilized (from three grenades) and the chimera on the right is stunned (from 2 grenades).

Not the best results that I could hope for, but I've neutralized two multilasers, immobilized one, none of the three of them can drop hull-flamers on me in retaliation, and if the IG player wants me dead, its going to take more than a little effort to get it done. I've got 6+ armour, 4+ Feel No Pain, and a good chance of a cover save depending on what is going to shoot at me and from where.
Honestly though, you'll find that your opponents either deploy on the line and you won't have trouble making range, or that they deploy far away to be sure (mostly in spearhead) in which case you couldn't make it anyway.
Armour facings
This is a big one. When your opponents move and pivot, they're trying to present front armour wherever possible (unless side armour is the same). During your enemy movement phase, take note of what moved, how far, and where its facings are. Do it again at the start of your movement phase. Don't be afraid to use your tape measure or something else to draw a line across the top of an enemy vehicle to check its armour facings. See where those armour facings extend to. If you can move into a facing to shoot side armour (AV11 or 10 instead of 12/13) then exploit it. It is extremely difficult to protect side armour against Dark Eldar, and you must be cognizant of any openings to take advantage of it.
Opponents will typically ensure their front armour is facing your current threats to their armour - there's no choice but to do so. If you're in midfield with a 12" move (or 8-12" of angle changing based on re-embarking and moving 6" with facing utility), you'll find opportunities to fire into side armour.
Objectives
The obvious utility of your speed is the ability to move 24" late game and jump onto an objective. I don't need to expound on this, just stay cognizant throughout the game of where your scoring units are in relation to surviving vehicles, and where both are in relation to objectives. As a close combat fighter myself, I prefer to get into an enemy's face and deny them objectives on their side of the board.
Physical Roadblocks
A picture is worth 1,000 words, right?
That's 120 points of empty vehicles with 4+ cover saves for moving flat out blocking off the advance of an entire mechanized Ork Army. His choices there are to split his army in half to try going around, to try ramming through (which I'll dodge on a 3+), or to stay there for a turn. Use your vehicles to deny enemy access to units you need to protect. If you're going to try assaulting something with wyches and are worried about them not making it, you can protect their flanks with vehicles. If you're in the late game and running out of troop choices, use your vehicles to physically deny access to objective(s). I've had plenty of games that ended with me having 1 objective to 0 because I had 4+ cover vehicles that need a 6 to get hit on the charge impede the progress of an enemy unit getting in to contest an objective. Drop a raider 1" away from a monolith in front of the portal - it can't pivot until it moves away from you, and will negate the ability to take a second WBB at the start of their turn because the unit can't teleport through. Don't have the tools to take down a blessed hull land raider full of terminators? Flat out three vehicles to each side and in front of it 1" away (and behind it if you can). Nothing is getting out now, and you've got 4+ cover against any retaliatory fire. Obviously you don't want to do this to the detriment of negating your fire capabilities, but remember the ability, and look for opportunities where it might apply.
That's it for my speed segment. One up your opponent on the range guesstimation, exploit armour facings where you can, block their progress, and use that massive speed to help effect your devastating alpha-strike.
Target Prioritization
This isn’t a lengthy section because much of target prioritization is situational – depending on cover, immediate threats, units in range. I can’t give “Always shoot X instead of Y” kind of ruleset, but I will do my best to help you decide what to shoot. I’m not going to focus on target prioritization for assaults because assaults often come down to “What is available for me to assault” based on the damage your darklight has done, unless we’re talking about wyches with haywire grenades, in which case the prioritization rules for shooting apply almost the same.
Evaluate Highest Immediate Threats
When you look at an enemy army, the first thing you should do is go through their list and models, making sure that everything is either WYSIWYG or that you understand the proxying – you *MUST* know where critical threats are to you at all times. If someone is using rhinos as proxied razorbacks with las/plas mountings, make sure it is marked in some way that when you look at it in game, you won’t forget. There will be less of this at tournaments, but I’ve been unpleasantly surprised a time or two. When people hand me a list prior to a tournament game, I tell them that I’d prefer them to walk me through their army on their tray – so that I can visualize it. Looking at a list and seeing that there is an infantry platoon with an autocannon HWT inside a chimera is different than looking at a tray of models and seeing the models and the chimera that they are going to be in.
Targets that deserve the highest priority attention as a Dark Eldar player: Hydra Flak Cannons, Vendettas, Auto/Las Predators, AC/HB Baal Predators, Land Raiders with two or more 25”+ ranged weapons, enemy ravagers, Loota units, Longfangs, devastator squads, havoc squads, rifleman dreads, high-count obliterator units, and foot-slogging IG HWTs.
BLUF: Things that can put out high strength, high volume fire are your greatest threats. There are other threats, but the greatest threats are the things that can reliably kill something every turn.
After deployment, but before you make your first move, you consider every unit the enemy is fielding, including those in reserve, and decide which are the most dangerous to you.
A couple of examples:
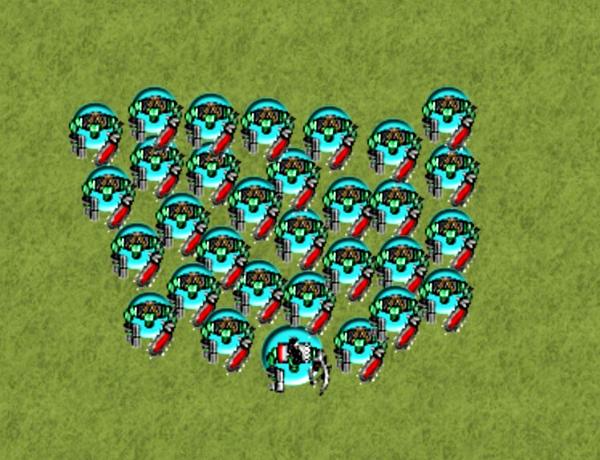
Example #1: Enemy Kan-Wall running 2 KFF Meks, 9x Killa-kans with rokkits, 45 Lootas, two deffkoptas (with rokkits and buzzsaws), and 3x20 shoota boyz with 3 big shootas per squad.
#1a: Lootas, highest threat. Very carefully look at deployment to see if there is even a REMOTE chance of getting 1+ Loota unit into assault on turn 1. I’d toss 5-9 wyches at 15 Lootas every day of the week. Win or lose (eventually) the Lootas aren’t firing. Every other non-vehicle weapon is probably going into the Lootas – boyz can wait.
#1b: Deffkoptas can scout and alpha-strike, but this isn’t an army I would deploy on the table against if I didn’t win the roll to go first – because it can reliably kill 5-7 of my vehicles in the first turn. Their threat is either high or low depending on deployment option, but easy to snuff out if they don’t get their alpha-strike.
#1c: Killa-kans: DE have no reliable answer for killa-kans except darklight weapons. And the kans have a 4+ cover and BS3 rokkits. They rate lower on the threat scale than Lootas or deffkoptas because they are *still* slow, can be dealt with at range, and at the end of the day…still only have BS3 rokkits.
Example #2: Enemy SW Player running triple long fangs, 4 razorbacks with grey hunters, three more razorbacks for the longfangs, two rune priests with living lightning, and a scout squad.
#2a: Longfangs, highest threat. More shots, can split fire, those three units can hit 6 targets per turn with high strength high volume fire. Every anti-infantry solution in my army is going to be 100% focused on them until every single one of them is dead. If there are only one or two left and I’ve run out of anti-infantry options, I’m going to lance and blaster them too – even over a vehicle.
#2b: Rune Priests have unlimited range STR7 Living Lightning. Whatever Longfang pack they are with, or whatever rhino or razorback they are in becomes the first vehicle target.
#2c: Still threatening but not as threatening as a full longfang pack are the razorbacks. Las/plas is the most common TAC setup (Single Lascannon along with a twin-linked plasma gun), and I value the single STR9 shot at range as less of a threat than 2a or 2b because it only gets a single shot.
This sort of target prioritization needs to happen at the start of every game – its critical to formulating your overall strategy, which at this point should be focused on a single thought: KILL KILL KILL KILL!
Rank Threats in Order
Something that I just jumped the gun on, but after determining what the highest threats are to you, the next order of business is to rank them mentally – from highest to lowest – of the threats to your particular army style. If you’re running a WWP army, you’ll rank threats different from a Hellion army, differently than a Wych Cult or a Kabal.
Compare Threats to Targets of Opportunity
Since we’re not playing in a vacuum, you can expect your opponent to expect you to prioritize their high-threat targets. So while that AutoLas Predator might be the highest threat in the army, it might also be hiding behind a vehicle screen to get a cover save. You might be bent on killing longfangs, and your enemy might leave them inside their transport to keep them save – willing to risk only taking two shots out of the hatch in exchange for keeping them alive. Having a list of the most important targets to you doesn’t mean you can go down the list shooting and assaulting them…..it just gives you a list of targets to explore for weaknesses. Can you get into side armour? Does it matter? Will that target be in assault range? How can you maneuver to get the best alpha-strike on it? This is where your generalship will shine on the field.
As you and your enemy move and shoot at each other, look for targets of opportunity. For example, if you’re focusing on some predators across the field and a Furioso dreadnought drops in on you out of a drop pod….your immediate reaction should be to look at its facings, see where it disembarks from, and look very closely for any opportunity to shoot its rear armour. It doesn’t have ranged weaponry, and you can easily stay away from it while focusing on targets across the field…..but if an opportunity exists to get a 3+ to hit, 2+ to glance on its rear armour from a couple of blaster toting Dark Eldar, take the target of opportunity. I wouldn’t waste the ammo on it from across the table until every ranged threat was dead, but if opportunity presents itself to present a target of opportunity, weigh it against the value of shooting at your priority targets. Another example: You wreck a chimera in the enemy deployment zone and 5 flamer toting veterans pile out in front of the chimera, out of cover. You’ve been saving your anti-infantry weaponry for the HWTs toting autocannons in the ruins over there. Which do you shoot at? Personally, I would probably give the flamer veterans a single salvo. Enough to potentially wipe them, or to cause the wounds for a leadership test. That’s a target of opportunity – something that isn’t the highest threat to you, but can be killed with minimal effort expended.
Use these four general rules when pursuing target priority:
- Get a clear shot. At the expense of all else, get a clear shot. If your choice is to move in cover where your shots will grant cover saves, or to move in the open where you get clear shots, leave the cover alone and go for the maximum chance of killing something.
- Get a Cover Save. The next priority is to get yourself cover saves. Deploy trueborn in cover if they’ll still get clear shots. Use your vehicles as mobile cover for disembarking infantry, with only a blaster poking around the front to get a clear shot.
- Get multiple firing solutions. Ideally, you want every anti-tank weapon in your army in range and with clear sight to multiple targets. You should never presume that any given shot is going to be “the lucky one” and explode an enemy vehicle, but you also don’t want to get that lucky shot and have more shots lined up suddenly without an appropriate target to shoot at. Get those ravagers multiple targets.
- Short range before long range. I generally shoot my close-range anti-tank before long range anti-tank, unless my short range firepower has a clear shot at something I care about that my long range firepower does not – one of the worst feelings in the world is to have a trueborn unit in an advanced deployment position and exposed (but willing to risk it to kill something critical), and for another unit to kill its target….and suddenly the trueborn unit has nothing else in range to shoot at.
And finally, a brief note on assaults: I said that I wouldn’t go in-depth because your assault targets are often a “as available” thing. If you do play a wych cult, or are packing a unit or two of wyches with haywire grenades, aim for high armour targets first, and a multi-assault second. Wyches alpha-striking a land raider or monolith would be the best use, or leman russes, predators, or other high armour targets that you can simply glance on a 2-5, ESPECIALLY squadrons.
Abusing Assault Mechanics
Dark Eldar don’t assault like other armies. You don’t have 5-10 terminators wielding thunderhammers and sitting on a 2+ armour save and a 3+ invulnerable save. Instead, you have T3 models who are STR3 as often as not, generally have 6+ armour saves, and sometimes have feel no pain. Does that mean that my wyches wouldn’t assault a unit of terminators? Absolutely not! Instead, you you have speed, high initiative, and a murderous look in your eye. Tying up or winning assaults against units with better stats than you is reliant on your expert use of the tools you have at hand.
I’m going to insert the assaulting rules here to save you a trip through your rulebook for references.
- Your assaulting unit must move your closest model to the closest model of the enemy unit you’ve declared as your primary target.
- Every other model in the unit now has your assault distance (either 6” or the highest of 2d6) to do anything they want, provided you meet the following conditions:
- Every model that can get into base must.
- You must move into base into base with models not in base contact first.
- Independent Characters move in first when the assaulted unit reacts to an assault.
- Every model you move into assault must retain coherency with a model that has already moved in (except for the first one assaulting in of course).
Defenders react uses the same rules – everyone who can get into base must do so, and unengaged (or models not in base contact already) take precedent. With those things in mind, here are some nifty tricks.
Hiding your HQ
So your wyches rolled a 6 for their combat drug for a free pain token, and they have a haemonculi along for the ride. They have feel no pain and furious charge! That is…unless you follow standard thinking and break the wyches off, in which case the haemonculi takes a pain token with him. Or, Baron Sathonyx is about to lead a full beast unit into the assault for 40 STR4 attacks and 24 STR3 rending attacks! The baron gives the beasts assault grenades, and you know that you’re going to win combat, then sit in cover with a 3+ save and defensive grenades so you can laugh off your opponent’s following turn. Except that you know the powerfist is going to take a shot at Baron Sathonyx, and he ALWAYS fails his Shadowfield on the first roll.
Fear not! Just because you're required to move everyone into base who can doesn’t mean that the IC is required to be in combat range. There’s nothing wrong with letting Baron Sathonyx trail at the rear of the unit, such that a 6” assault move won’t get him into base contact. You can also stick him in the middle rear so that he’ll be flanked by beasts – so that enemy pile-in moves won’t make it to him either. The same applies to your haemonculi. If you need a haemonculi with a unit but don’t want him getting insta-gibbed, leave him at the trailing end of the unit. Measure out 2” coherency and stick him at the very rear of where you are going.
Example: 5 terminators are sitting in the explosion marker for a land raider. You roll up with a raider full of wyches knowing that you’re going to need to 2d6 to get into terrain. Bear in mind that this is just an example. The wyches get out on the right side of the raider with the terminators straight ahead – 2” deployment from the raider puts you 1” away from the terminators…but only put your first model there. Since the terminators are going to have a 6” react to contact, you have 6” to play with. String your models out 7-8” with the haemonculi in the back next to the raider…he’s now 8-9” away from the terminators.
When you assault 2d6 into the terminators:
- If you roll 1,1 – you get into base contact because you’re 1” away. The terminators have 6” to pile in, and can’t make it the 8” to your haemonculi. But the assault rules *do* make them pile down the line so that the rest of your wyches are engaged.
- If you roll anything else: Your haemonculi assaults in first – but he’s further than 6” away so can’t make it. Move him up along the raider 6” (or 2d6 highest, whichever): The pile the rest of your wyches in. You’ve now walled off the terminators from getting to your haemonculi.
The same applies to the Baron or any HQ that you don’t want to risk in CC. Obviously the results for this aren’t guaranteed to keep your IC safe in subsequent rounds of combat, but it can keep them safe on the charge, or in getting charged – and *can* keep you safe in subsequent turns if you have enough models and remove casualties in such a way that 6” pile in with your IC still won’t get them into base contact.
Conga Lines and multi-assaults
Who hasn't seen an infantry conga line? A wall of IG infantry protecting HWTs or vehicles. A gretchin unit screening Lootas. A line of marines squeezing between terrain and in a column formation. Look for opportunities to assault or multi-assault a conga line - the 6" pile-in will benefit you if they can only fit in a few models. If there are a line of guardsmen spread 24” across the front of their army, assault one corner of it. Put yourself 6” away on your fleet (or about 5.5” or as close as you can judge) so that on the assault, you get a single guardsman – but the rest of your models will be within 2” of your assaulting model. As he piles down the line to get into combat….only a couple of his models are going to get to hit you back. It will be bloody.
One of my favorite anti-IG tactics is to move my assault units up, disembark, and work on taking down a chimera next to the target I want to assault - if I can explode it, then I try to fleet up 1" away from my target, declare primary on the vehicle I’m going to assault, secondary on the troops in the exploded transport, and tertiary on any other vehicle I can reach. Ideally, I want to put one wych into the infantry unit and the rest of my wyches into vehicles. Boom – if I managed to explode/wreck a transport I’m in close combat and safe from countering fire. Assaulting a vehicle with haywire grenades, killing it, and having the passengers flame your unit to death the next turn is bad. Or having nearby vehicles turn hull-flamers on you – also bad. Drop a single wych into close combat on a multi-assault so that you’re not likely to hurt or wipe the unit so that you can stay locked up for a turn – long enough for you to pile in and wipe them out on your turn so that you can go back out and do more damage.
Another good use of multi-assaults is against hard targets. So the Avatar if Khaine is hiding behind a building, you can’t get to him with your dark lances or blasters because he’s on his hands and knees groveling behind LOS blocking terrain. There’s a big squad of dire avengers next to him. Assaulting the Avatar would be painful because of his WS and toughness. Instead, multi-assault! Drop wych into the Avatar and the rest of them into the dire avengers. Kill 10 dire avengers, lose 2 wyches to the avatar’s attacks, and you’ve won by 8. And the avatar takes 8 wounds and needs to make 8 saves – more than if you had assaulted him by himself. Splinter weapons have made high toughness targets a joke, but sometimes you need assault options.
General rules for this point: If you’re going to assault vehicles, tie into an infantry unit if you can, and assault Conga-lines from an end.
Denying attacks
YOU can conga-line too, and against the same targets. When you’re making an assault move, you should always be looking for an angle of assault that will let as few enemy models get into base or coherency as possible. I mentioned this earlier, but assault spacing and fleet movements are critical. Any opportunity to assault where you can make your full assault move and only get ONE model into base contact, but the rest of your unit in coherency with that one model while your enemy pile-in moves won’t get much engaged with you – that’s the pinnacle of strategic achievement in assault.
Also worthy of note: There’s no requirement attached to the order that you move your models, as long as you’re not moving through your own models. Pictures would be helpful here but I have none to show at the moment. How often do you get assaulted, and your pile in move brings more enemy models into engagement? Orks live and die by it. You can deny some of this – as you take your full 6” pile-in move, look for opportunities to move troops into base, or piling in where they would block off access of other models of yours getting further down the line and bringing more enemy models into the fight. A 6” pile-in with a wych might get you into an unengaged model of the enemy down the line, but if you block off the wych’s ability to get there in 6” by piling in other models first – to their own maximum 6” and following the assault rules for piling in…you can deny attacks.
Just keep looking for those angles. Use your movement to try creating enemy columns if they aren’t already doing it. Space marines disembarking from a rhino get out in a column half the time from the side. Boom – pull up next to the and park a raider 1” away from them (parallel parking) to block them between their rhino and your raider. Pile out wyches and assault the head of the column. You can pile around your lead two wyches, but the marines are stuck in a column of two, and are going to get 6 marines into the assault instead of 10.
I apologize for my examples, they aren’t the only situations, or even the best ones to use certain tactics in, but they fit the description of what I’m seeing in my head as best as I can make them. Here's an example of the situation I just described.
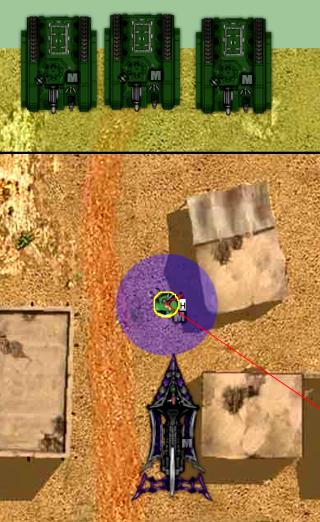
In this picture, a raider pulls up next to a squad of marines. I check 1" spacing to make sure that I'm 1" away. I could be a bit closer, and I fix it in a later picture; Vassal is annoying to freely rotate models. The wyches disembark below - all within 2" of the raider, but not trying to get up in the marine's junk. Their disembarkation doesn't matter in this instance, but I'm deploying away to show my point of the conga line, which I'll explain shortly.
I roll for fleet and get a 4" movement, and fleet away from the Marines to put myself at maximum assault distance. At least I'm somewhere between 5-6" away, I'm not good at precision eyeballing.

Now I'm ready for an assault. My closest model has to move to the closest enemy model. That's a 6" bubble and it looks like I'm about 4.8" away with my closest model.
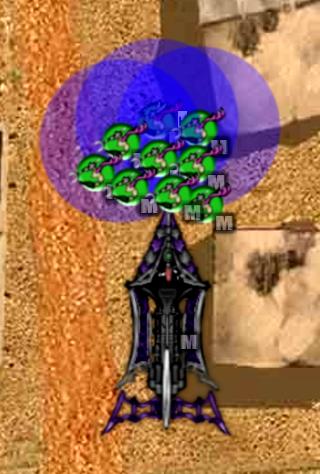
And now I've assaulted. Closest model to closest model. I have one more model that can get into base contact, so I do. Everyone else piles into the rear.
Defenders react. With me being 1" away, they pile in the best they can, which is not much. Everyone within 2" of someone in base can attack (see the blue circles) meaning that I've denied 4 marines from getting their attacks. Obviously since I'm I6 I'm going to attack first, and if the marine player takes casualties, he'll pull from the back to mitigate his inability to attack. However, if there's a powerfist or a power weapon back there - something with a better chance of hurting me, bwah ha ha. Suck it Trebek.

Disruptive Psychology
This final piece of my article deals with disrupting your enemy’s plans and messing with their heads. Don’t be foolish enough to think that psychology isn’t part of 40k. Your own psychology (if you have followed my guide) is a single-minded unstinting focus on absolute lethality. You know what your threats are in order of danger, you have a plan in mind to deal with them, and you’ve analyzed your enemy’s army, the table and terrain to create your plan for tabling their army and making them question the validity of their existence and participation in the hobby.
Your enemy is doing all the same things you are.
Disruptive psychology is the art of making your enemy second-guess themselves, lose focus and make mistakes to your advantage. You could even call it a facet of social engineering. A smirk at a critical moment can change the course of a game. They key to this is to make comments or facial expressions designed to make your opponent believe that they either just made a mistake, are about to make a mistake, or just did something favorable to you (even if it isn’t). Some examples:
Example #1: You roll for deployment option with your opponent and lose. It is an objective game, and he gives you first turn. You deploy accordingly. Your opponent deploys in response. He picks up the dice to roll to seize, and you look at him with shock and say, “Wait, you WANT to go first? I was figuring you wanted the last say-so on who controls the objectives at the end of the game.” In reality, you know that he’s not going to be alive at the end of the game, and you also know that getting seized on will negatively impact your alpha-strike. You want to go first to make sure you inflict maximum possible damage and couldn’t care less about objectives. Part of the time, your opponent will put their dice back down – they only picked it up out of habit. Part of the time, they will say “I thought seizing the initiative was mandatory” and you can show them them it is not. And part of the time, they will roll anyway. In two of those scenarios, you’ve just gained a significant advantage.
Example #2: Your opponent is playing Mechanized Blood Angels and has six predators. As they’re deploying their Baal predators with flamestorm cannons near the front to scout/smoke and try living through whatever you do so that they can flame your wyches/beasts or anything else they can shoot out of a transport, you look at them with a bit of amusement and ask, “So you’re NOT going to outflank those?” Your opponent will have to think about it. Do they really want to risk losing their baal predator before it ever gets to shoot? It only take a single darklight shot to explode it…and you have SO MANY darklight weapons. Sometimes it will stay out…sometimes it will go into reserve. In reality, whether you could have exploded it or not is irrelevant. With a speedy list of your own, it was probably a turn 2 threat anyway unless you were wanting to move up and disembark trueborn to get shots. If it goes into reserve, its now a threat that you don’t have to worry about until turn 2. Or three. Or four. Until after you’ve had your way with everything else out there.
Example #3: Your opponent deploys a unit where you will have difficulty getting it. Or to it. Or getting LOS to it. Smirk and cover your mouth. Either they’ll think that putting their model there is a mistake and second-guess themselves, or they’ll think that you’re complimenting their tactical prowess. Either way, it’s a shot at stealing some of their confidence.
Example #4: Enemy unit or transport is moving up into assault range – a fight you may or may not win, but definitely not to your advantage to get assaulted. Smile wickedly, chuckle, and say, “This will be fun.” Your opponent will second-guess the wisdom of assaulting you, start crunching the numbers in their head, re-look at their unit locations and yours…
The goal here isn’t necessarily to get your opponent change their mind, but to lose their game-face and second-guess themselves. 40k isn’t just army vs. army, it is also player vs. player. The opportunities that you have to inject doubt into your opponent’s strategy are things you’re going to have to find and exploit, because everyone is different. But if you can tell that your opponent is struggling to make a decision about what action to take…inject some doubt if they make the one that would hurt you more.
And that’s it! The end of my advanced tips and tricks. Your army (via links at the top or other DE list discussions) has the tools to take down any army impudent and foolish enough to take the field against you. Now you have guidelines on how to use those tools to maximum effect, with the added benefit of turning your opponent into a quivering pile of self-doubt and eventual self-loathing.
Go forth now my minions – torture, enslave, and feast on the cattle that come willingly to your slaughter.
Shock Prows: Abusing the Tank Shock
So some of the chat elsewhere about how 40k doesn't really have any advanced tactics, its all about luck, its not a deep game, general disparaging remarks designed to dismiss people like me who feel that skill is the supreme deciding factor in 40k instead of dice rolls....well, I don't buy it (obviously). I think I'm pretty damned good manipulating toy plastic soldiers. Everything above is intermediate tactics - not the kind of thing that novice generals generally play at a skill level to incorporate. For giggles, I thought I'd include a particularly advanced tactic.
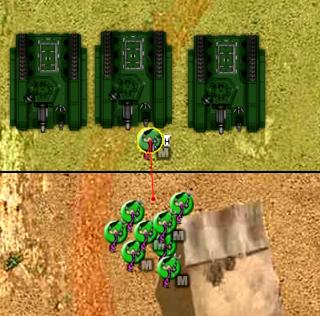
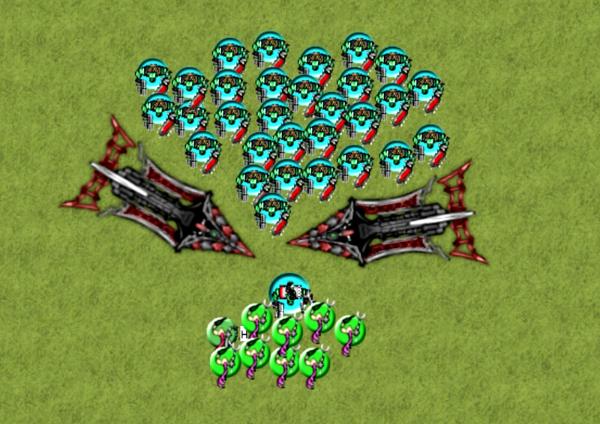
Dark Eldar vehicles have a pointy prow. Did you know that you can use that to abuse tank shocks to gain particularly advantageous assaults? For example...9 wyches assaulting into 30 boyz and only two getting to strike back? Here's an example.
This mob of Ork boyz is relaxing after a hard day's work choppin' da grazz with dey choppas.
Tank shock #1:
Dark Eldar Raider tank shocks into the unit - taking great care to avoid the powerklaw. In my experience, Orks wouldn't DoG anyway and risk their powerklaw, especially being fearless, and with you presenting a ripe assault target right on top of them. This requires some precision tank shocking. You need to be able to position and rotate your vehicle in such a way that you push the orks backwards instead of being able to circle around your raider. Remember that a tank shocked unit must take the SHORTEST POSSIBLE ROUTE to get 1" away from the enemy unit - so your tank shock needs to make it such that the shortest route is backwards, and not forward onto the other side of the raider. 1/2" backwards is shorter than 1.5" forward.

At the end of the tank shock, the orks have all moved the shortest route possible to get 1" away from the raider.

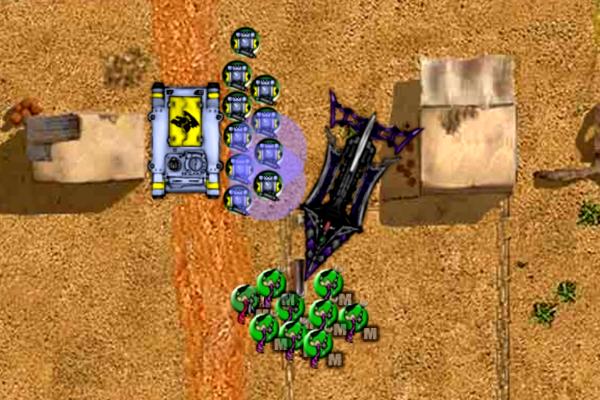
Tank shock #2:
The second raider neatly bisects the ork unit, still avoiding the Powerklaw. Again - my experience says that Ork players would choose not to DoG and risk losing their bosspole and powerklaw...but I prefer to not take chances.
Again, forcing every ork to retain 1" distance from enemy models while maintaining 2" coherency. There was one ork that was on the border about which side was closer to go to, but Vassal doesn't give you effective tools to minutely move and rotate models. It wouldn't matter either way - if the second ork had come through to the other side, you still could have manipulated the assault to only hit one model (I demonstrated that principle earlier in the thread).
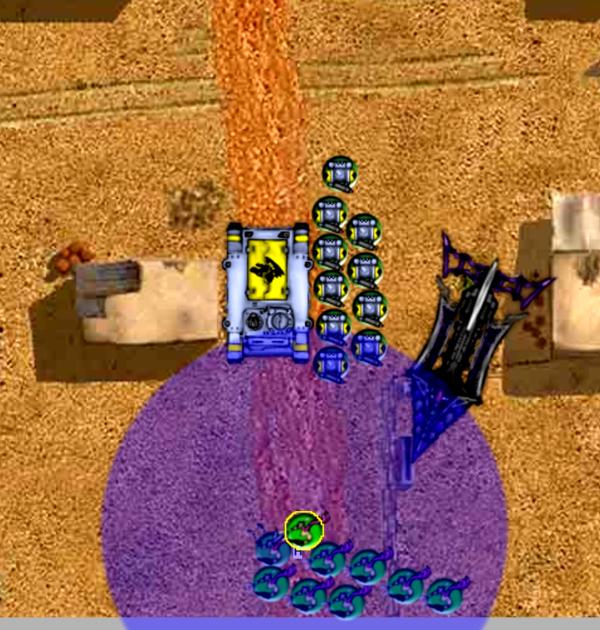
And here's a unit of wyches disembarking from their own raider in preparation for assault. In terms of determining the precise distance if you aren't good at eyeballing 6", I covered that earlier too.

Wyches assault in: One model is in base contact, and one model is within 2" coherency - and the orks can't do anything about it - the gap between the raiders is too small to let further orks through.
Random D6 gives me a 5 for drugs (+1 attack)
Random D6 for the Hydra Gauntlet gives me a 1 (boo!)
A quick roll through vassal with 4+ to hit, 5+ to wound says...8 wounds. Orks roll 6+ saves and fail 7.
In return, the Ork boy strikes back needing 4+ to hit, 4+ to wound and does 0 wounds.
The Ork nob strikes back needing 4+ to hit, 2+ to wound and does 1 wound.
I roll a 4+ invulnerable save and fail.
I won by 6! 5-6 more orks die, and we're locked - with no pile in moves available for the time being - leaving it 8 wyches vs the horde of orks, of which only two will get to attack.
40k is ruled by luck indeed....