Building a Wargaming Table
Written by by Redbeard
The following article presents plans for building a 4x6 gaming table, with gutters along the long table edges for models not-yet deployed, casualties, and beers.

Redbeard's 4x8 version of this table
This article is intended for people with minimal carpentry skills, although knowing how to use a hammer, saw, drill, and measuring tape is assumed.
Tools Needed
Bare minimum: Hand saw, hammer, pencil, tape measure
Better: Circular Saw, Power drill w/ screwdriver bit.
Materials Needed
Many of the materials listed below are just approximations. You can substitute alternate measurements, and even make a longer (4x8) or wider table if you so desire. The materials listed below will run between $50-100, and are what the plans show, but with a little measurement, you can make the relevant adjustments as needed.
4 4-foot long 4"x4"s (Dark Blue in plans)
16 6-foot long 1/2"x4" beams. Your local home improvement shop should carry a supply of more-finished lumber like this. You're not looking for construction grade 2x4s, you're looking for finishing grade wood. They're probably sold in 8' lengths though, so you'll need to trim them to fit. (These are seen as light-blue in the pictures if viewed from the side, and yellowish if viewed from above.)
2 4'x6' boards. You can go with either plywood or particle board, depending on your budget. I'd avoid going over 1/2 inch, but it really doesn't matter that much. I think my table is 1/4" plywood, but the one I built with a friend for his basement is 1/2" particle board. (Orange)
2 to 3 inch long wood screws or nails. I advise using wood screws, but nails will work if you don't have a power drill. (Seen as a line indicating a screw goes here if viewed from above, or a small + if viewed from the front (dark green if behind another surface).
A box of small finishing nails (make sure they're at least 1/4 to 1/2 longer than the width of the surface you chose.
Steps
Step 1: Building the top frame
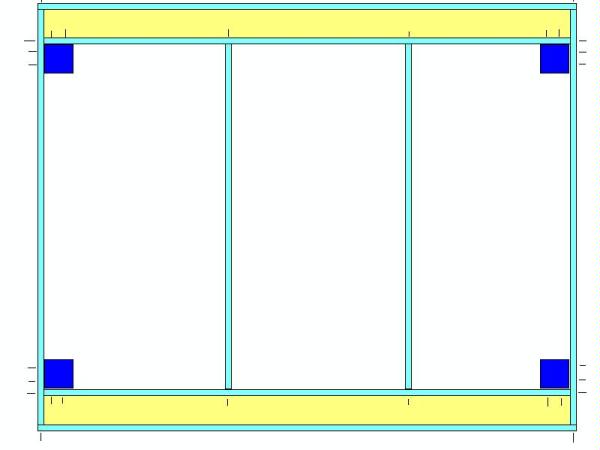
Start by laying out the outer border on the floor. Then place the gutter bottom, and the inner gutter wall. Attach the inner gutter wall to the short table edges first. If you attach the outside first, you will have a hard time connecting the middle support rails. Throughout the process, refer to the pictures if you have questions about where to place the screws.
Next, attach the inner support rails. If you make the table longer, you'll want to add additional rails, roughly every two feet apart is sufficient for the weight that a gaming table will need to support.
Note, as you can see in the picture, the lengths of the inner and outer supports are not the same. And, because the width of these pieces can vary, depending on what you chose to use, you'll need to measure and trim these beams.
Step 2: Attaching the legs
With the frame on a flat surface, you can attach the legs, so you essentially have an upside-down table. If you want to make the table less permanent, you can drill through the legs and frame and use removable bolts instead of wood screws for this step.
After the legs are attached, move on to adding the gutter bottom, and finally, the outer frame edge.
Once the gutters are attached, you can (with the help of a friend, probably) upend the table so that it is standing on the legs.
Step 3: Adding the bottom frame

Add the bottom frame about a foot from the ground. Start with the long table edges, attaching them to the legs as you go. Then add the short table edges, and finally, the support rails. The bottom frame adds needed stability to the table, without it, you run the risk of a collapse. With it, the table is incredibly sturdy.
Step 4: Adding the table top and shelf
Finally, use the small nails to attach the table surface. You don't need to use a lot, one every foot along the bracing beams should suffice, as the top isn't going to be taking a lot of horizontal stress. The bottom shelf needs to have the corners cut away so that the legs fit, and will need to be cut in at least two pieces so that you can add it. If you plan to play on the table surface, and you chose a plywood top, you'll want to put some effort into sanding it to remove potential splinters. If you picked a particle-board top, or you're going to use a terrain board on top of the table, this is less important.
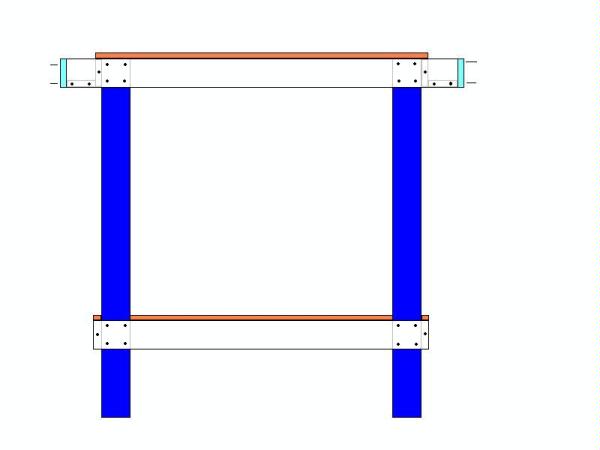
Short Edge View
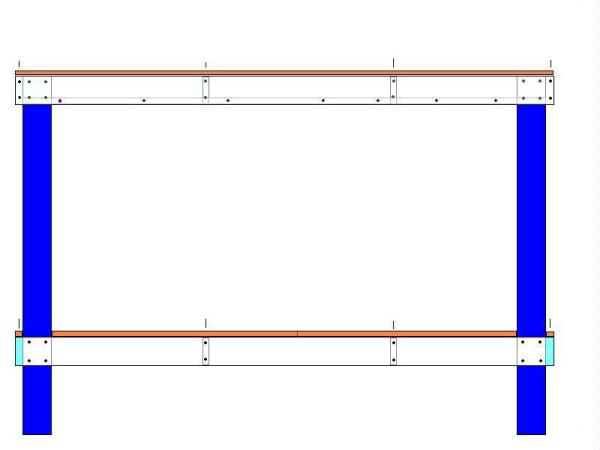
Long Edge View
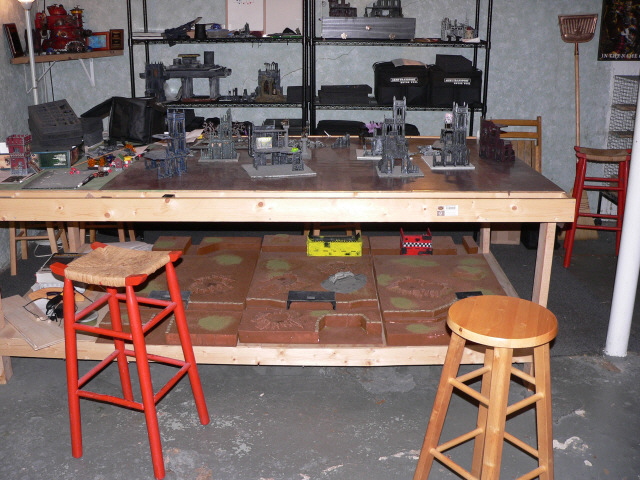
The Finished Table
Additional Enhancements
Some other addition ideas for those looking for advanced projects:
The table can have additional length through the use of hinged sections. With 4' legs, you can fit an extra 3' of table space on either side of the table. Using a simple 1x1 square dowel, and cutting away a channel for it to live in in the short table edge and support beams, you can use this to support the hinged section when it is extended, and tuck it away for every day use.
As the support beams are the gutter sit at the same depth, you can also add rails for additional sliding storage. Or, you could add some simple hinged panels to close off the bottom shelf, keeping this storage space out of sight.