This article is a combination of a number of different sources including personal experience, forum discussions and this article by ifurita.
Introduction
Painting is an enjoyable, relaxing experience, but staring at a massive pile of grey and silver miniatures can get depressing (no offense meant to space wolves and necron gamers!). This article will attempt to cover the different ways you can speed up your painting process without adversely affecting the quality or your enjoyment. Even if your goal isn't 100 figures by the end of the week, you can still use some of these techniques to free up time to spend on detailing and other things.
When you increase painting speed, you may make trade-offs in quality. You need to be OK with this. In my case, I'm aiming for tabletop standard where people are going to be looking at units of figures from 9-18 inches away. As such, I'm not going to sweat the small stuff like making sure everything is absolutely painted between the lines or that everything isn't subtly shaded up to the final highlights. That being said, just because you're painting quickly DOES NOT have to mean that you're turning out low quality work. The Cygnar Charger shown here was spray primed Ultramarine Blue, basecoated with VMC Gunmetal

Master The Fundamentals
Speed painting isn't a replacement for being a good basic painter. Quite the opposite. It's the ability to execute well on the basics of color selection, brush control, highlighting, and washing, that allows you to take shortcuts and still come up with good results....
Brushes and Tools
Use the Best Brushes
Using poor quality brushes will slow down your painting considerably. A brush that forks, has bristles sticking out all over the place or has poor spread and absorbency will just mean you make more mistakes which you will have to correct later. As soon as a brush starts deteriorating, replace it or trim off any rogue hairs. Buy the best acrylic brushes that you can afford and painting will become less of a fight with your tools and a much nicer experience. The best brushes available right now are arguably Windsor and Newton Series 7 brushes. Windsor and Newton were the suppliers for the red handle GW brushes before they got replaced with the cheap and nasty blue handle brushes, and the Series 7 brushes are considerably superior to the red handle GW brushes.
Use the Biggest Brush Possible
A pretty simple tip is to use the largest brush that you can. Almost all work on a regular 28mm model can be done with a size 1 brush (GW standard brush). The bigger the brush, the more paint and coverage you can do in one go, without having to continually go back to your palette and prevents having to clean the brush again and again. I typically use #1, #2 or #5 brushes. In the Bloodletters below, the only time I picked up a 000 brush was to paint the eyes and pick out the teeth. Just about everything else was painted with a #2 or #1 flat brush. The highlights on the Tau Hammerhead were mostly done with a 1/2" flat brush.
Naturally, if you've developed good brush control skills, then you can use the larger brushes more effectively, so this is a fundamental skill you'll need to work on if you don't already have it.
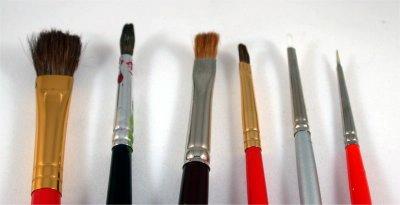
Here's a selection of brushes I typically use. From left to right:
- 1/2" (#10) brush. Highlights and drybrushing on very large pieces such as vehicles.
- #5 round brush. This is my standard brush for my Paynes Grey washes
- #4 flat brush. I use this for basecoating large areas. The flat edge also makes it a good brush for edging.
- #2 flat brush. This is probably the brush I use most often. It's large enough to put down a fair amount of paint and because it's flat, I can use the corner or edge to get more precise results.
- #1 flat brush. I use the #1 when the #2 is too big.
- 000. This is only used for fine detail and lining. I do very little basecoating or washing with it.
Wet Palette Painting
If you find yourself painting a lot of highlights and mixing a lot of paint then you should try using a wet palette. A wet palette is basically blotting paper on top of a wet sponge in a waterproof, airtight container. Using a wet palette will give a continued supply of moisture to your paints, preventing your mixes from drying out and even allowing the same mixes to be reused between painting sessions. Great if you are continually interrupted when painting.
Use A Colored Primer To Eliminate The Basecoat
I hate basecoating figures. Where possible, I like to prime figures and vehicles in the base color, which allows me to cut out this step and save a lot of time. This may take a little bit of research on your part, but it's worth the time to wander through your local hardware store and look at the different brands and colors of spray paints available. Rustoleum in particular seems to have a nice range of outdoor and camo colors (tan, olive drab, and army green) but you can similiar colors from other manufacturers.
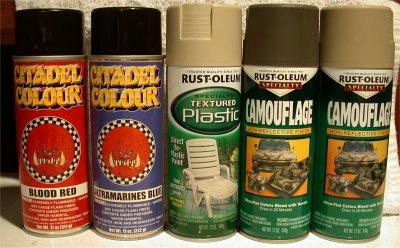
A couple of things to consider when you're looking at various spray primers. Some of these considerations are going to require that you actually buy a can to try out, but at ~$5.00 for a can of spray paint, it's not too bad of an investment.
- Has to be a matte color. If you use a gloss, it won't take paint very well.
- Find a color that has a very close match to an existing Citadel, Vallejo, or P3 color. You're going to make mistakes and will need to touch up your basecoat here and there. If you can find an exact color match, the process will be fairly painless.
- Pick a spray primer that will take a wash. A wash is probably the easiest and fastest way to achieve shading, so a primer that will take a wash nicely allows you to speed up this process. The Citadel sprays take washes quite nicely, but unfortunately have been discontinued.
Here's a Tau Hammerhead that was spray primed using Rustoleum Specialty Textured Plastic. It's a very good color match with Citadel Dheneb Stone (Foundation) and has a bit of a gritty texture, which I liked for the Hammerhead, though I probably wouldn't use it for troops. As a result, the only thing I had to paint on the Hammerhead were the green and black parts and the highlighting.

Airbrushing
If you are unable to find a suitable primer to use as the first coat of paint, anything with a large amount of base colour such as tanks, space marines, tyranids, necrons, etc. will benefit hugely from having the base colour airbrushed on. This will save a considerable amount of time and give you a smooth, even coat to work from once you master the basic airbrush techniques.
Paints
Rely On Technique To Deliver Results
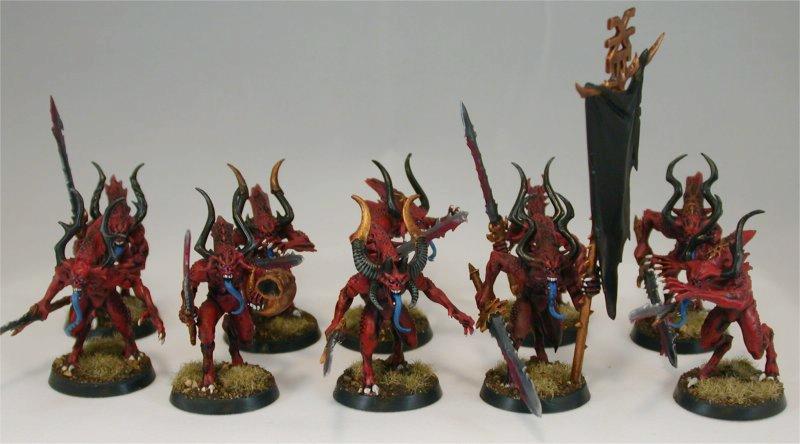
This unit of 8 Bloodletters, excluding assembly, prep, and the banner, (which I still need to finish) took 158 minutes, including the basing. I only counted the 8 figures because I painted 2 of them separately as a test. Painting up a test miniature can actually be a time saver too because you'll learn what steps can be consolidated or re-ordered to speed the process.
I started by priming them with Citadel Blood Red spray and then washing them with Paynes Grey after doing the other basecoats with a #2 flat brush. Because I know the Paynes Grey will flow into the recesses nicely, I don't worry about minor overpainting ... the wash will cover it up. The brass is painted the same way, Vallejo Brassy Brass applied with the #2 brush then washed with Liquitex Burnt Umber. I don't worry about not covering absolutely everything in brass because the wash will cover some of it and the rest will never get seem.
Just like I look for a primer that can take the place of the basecoat, I look for a wash that works for multiple colors. The product I use is Liquitex Paynes Grey. In fact, I wrote up an entire article on this, The Secret Ingredient: Paynes Grey. This is a wash that I can use over a wide range of colors, meaning that I only need a single wash over the entire figure, instead of multiple washes over parts of the model. Also, because I'm only using a single wash, this cuts down on the amount of waiting time needed.
After the wash dries, a quick drybrush re-establishes the highlights on the skin, horns, and sword. Drybrushing is also a great technique to bring out armor, scales, and fur ... basically anything with a lot of texture.
The citadel washes are also highly recommended if you want to save time mixing up specific washes with matte medium or dish soap each time, and dont have any other premixed washes.
Be Smart About Color Choices
If you're painting for tabletop quality, smart color choices can help your units stand out. The Bloodletters above use blue as a secondary color. The eyes and the tongue are done in Citadel Enchanted Blue which draws the eye to the faces and adds a nice spot of color in an otherwise red model.
Color choices also apply to the base. I based my Bloodletters in brown dirt and then used a lighter color of static grass to help bring some contrast to the model, which I think helps them stand out.
Premixed Paint
If you use a consistent range of colours and find yourself frequently mixing certain shades when highlighting for example, then you can save a considerable amount of time by getting an empty paint pot and mixing up a pot of paint. For example, instead of mixing up some black to grey highlights every time you want to highlight some black, you could get three empty pots and put different mixes of black and grey in them, allowing you to do rapid highlighting in the future. I have three pots containing different mixes of codex grey and chaos black, allowing easy, consistent highlighting of one of the most common colours there is.
High Pigment Paint
Using high pigment paint such as games workshop foundation paints or vallejo model color paints will save you a lot of time as you will be able to paint your miniatures with fewer coats, meaning fewer potential mistakes and less time spent going over blotchy areas. Try and plan high pigment colours in your colour schemes when coming up with a design for a new army or unit.
Environment
Lighting
Make sure your painting area has good lighting at any time of the day. This can usually be accomplished with a good, flexible desk light that has a blue tinted bulb. Using normal light bulbs is fine, but your models will look different in the daytime as normal bulbs tend to have a yellow or orange tint, whereas natural light is more blue tinted. This can cause a big difference in the appearance of your models and can lead you to notice errors that you might not have otherwise seen. Better light will save you time!
Paint Station Setup
If at all possible, having your painting area always ready to go will obviously save you setup time when you want to paint. If you are unable to have a space in your house dedicated to painting, then having a painting station that can be concealed is also a big time saver. For example, some people use large, portable 'art kits' to contain all their paints, brushes and materials which can then be put down along with a sheet of newspaper and some water for their paints and then they are ready to go. Keep your paints well mixed and well sorted to make it easier to find them too!
Take The Assembly Process Into Account
I've been working on some new Orks. I assembled them and then as I was painting them, I was cursing them because they were a pain in the ass to paint because the arms and weapons get in the way of getting to some of the detail on the torso. As I plan the next batch of figures, I'll assemble the legs, torso, and head but hold off attaching the arms until everything is basecoated at which time I'll attach the arms and then wash the entire figure. In this way, I can basecoat much faster and more completely, and then highlight just the parts that are easily accessible.
I took this same approach to the Trukk I'm painting. Keeping the component parts separate make each piece easier to handle and paint. As you can see, the Ork driver and gunner are much easier to basecoat when they're separate pieces vs being already glued into the Trukk.
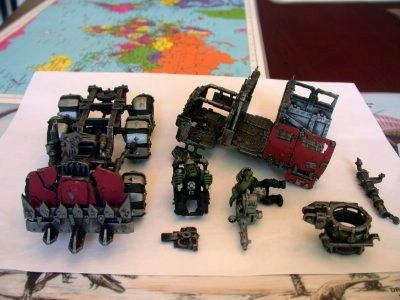
Once the major pieces are basecoated and washed, (again, with Paynes Grey) everything is assembled. Here we have a basecoated and washed Trukk that certainly needs more work, but is tabletop acceptable.

Assembly Line Painting
Painting in assembly line mode can be quite boring but gets the job done a lot faster. The key is to break down your painting into units of 5 or 10, and to paint all of one colour on each model, one at a time, then when finished on all 5, go back to the first one and add the next colour and so on. This has a number of advantages, namely that you get consistent looking units and you get faster and faster as you get more experience painting that type of miniature. You dont have to waste as much time preparing and swapping colours either.